Over time, your Android phone or tablet has likely connected to dozens of Wi-Fi networks — and it remembers every single one. Whether it’s a hotspot at home, school, work, the gym, a coffee shop, a relative’s apartment — or even from a friend’s phone — each time you type in a Wi-Fi password, your Android device saves it for safekeeping and easy access later.
The trouble comes when you want to actually see the password for one of the networks you’ve connected to before.
Perhaps you want to connect a second device to a saved wireless access point, or maybe you’re with a friend who wants to log in to the same hotspot. If you can’t get the password from the source, you might think to check your Android phone or tablet for the credentials — but looking at the stored Wi-Fi network in your settings won’t always show the password in plain text, depending on your device, Android version, and/or Android skin.
It is possible to see plain text Wi-Fi network passwords from your device’s settings, but for many devices, it’s not always obvious where to look. If you have a phone or tablet with an Android skin, such as any Samsung Galaxy running One UI 5 or earlier, it will be even less obvious than on a stock Android device (e.g., Google Pixel). Either way, it’s fairly easy to find saved Wi-Fi passwords on Android — though not as seamless as on Apple devices starting in iOS 16 and iPadOS 16.
Before we proceed with the instructions, keep in mind that most Wi-Fi menus refer to saved connections by their SSID — short for Service Set Identifier — which is just a technical term for the network’s name. This applies to all types of wireless access points, including home networks, public hotspots, and mobile tethering connections.
Jump to your instructions:
Huge Deal: Protect Your Android Device While Connected to Wi-Fi with FastestVPN Lifetime Subscription
Stock Android 10 to Android 15
Finding the plain text password for a stored Wi-Fi network is easiest on stock Android 10 through Android 15. No root is needed, and it doesn’t even require an extra app.
Google’s Pixel devices can run Android 10 or higher, with the Pixel 6 and newer models supporting Android 15, the latest system update, as well as Android 16, currently in beta.
The process is similar for non-Google Android smartphones and tablets running a near-stock Android experience. It may also work on other models without heavily customized connection menus.
Quick steps:
-
Open the Wi-Fi or Internet submenu in Settings.
-
Tap the current network or select one from Saved Networks.
-
Tap Share below the network’s name.
-
Authenticate yourself if you have device security set up.
-
See the plain text password under the QR code.
Full instructions:
First, visit the Wi-Fi preferences in your Settings app. Depending on your phone model and software, here are a few different ways you can find it:
-
Search for “wifi” in Settings, then tap the Wi-Fi result.
-
Ask Google Assistant or Gemini to “open Wi-Fi settings.”
-
Long-press the Internet or Wi-Fi control in the Quick Settings.
-
Go to Settings » Network & internet » Internet.
-
Go to Settings » Network & internet » Wi-Fi.
On the Wi-Fi or Internet preferences, tap the network you’re connected to if that’s the one you need the password for. Alternatively, you can choose another saved network.
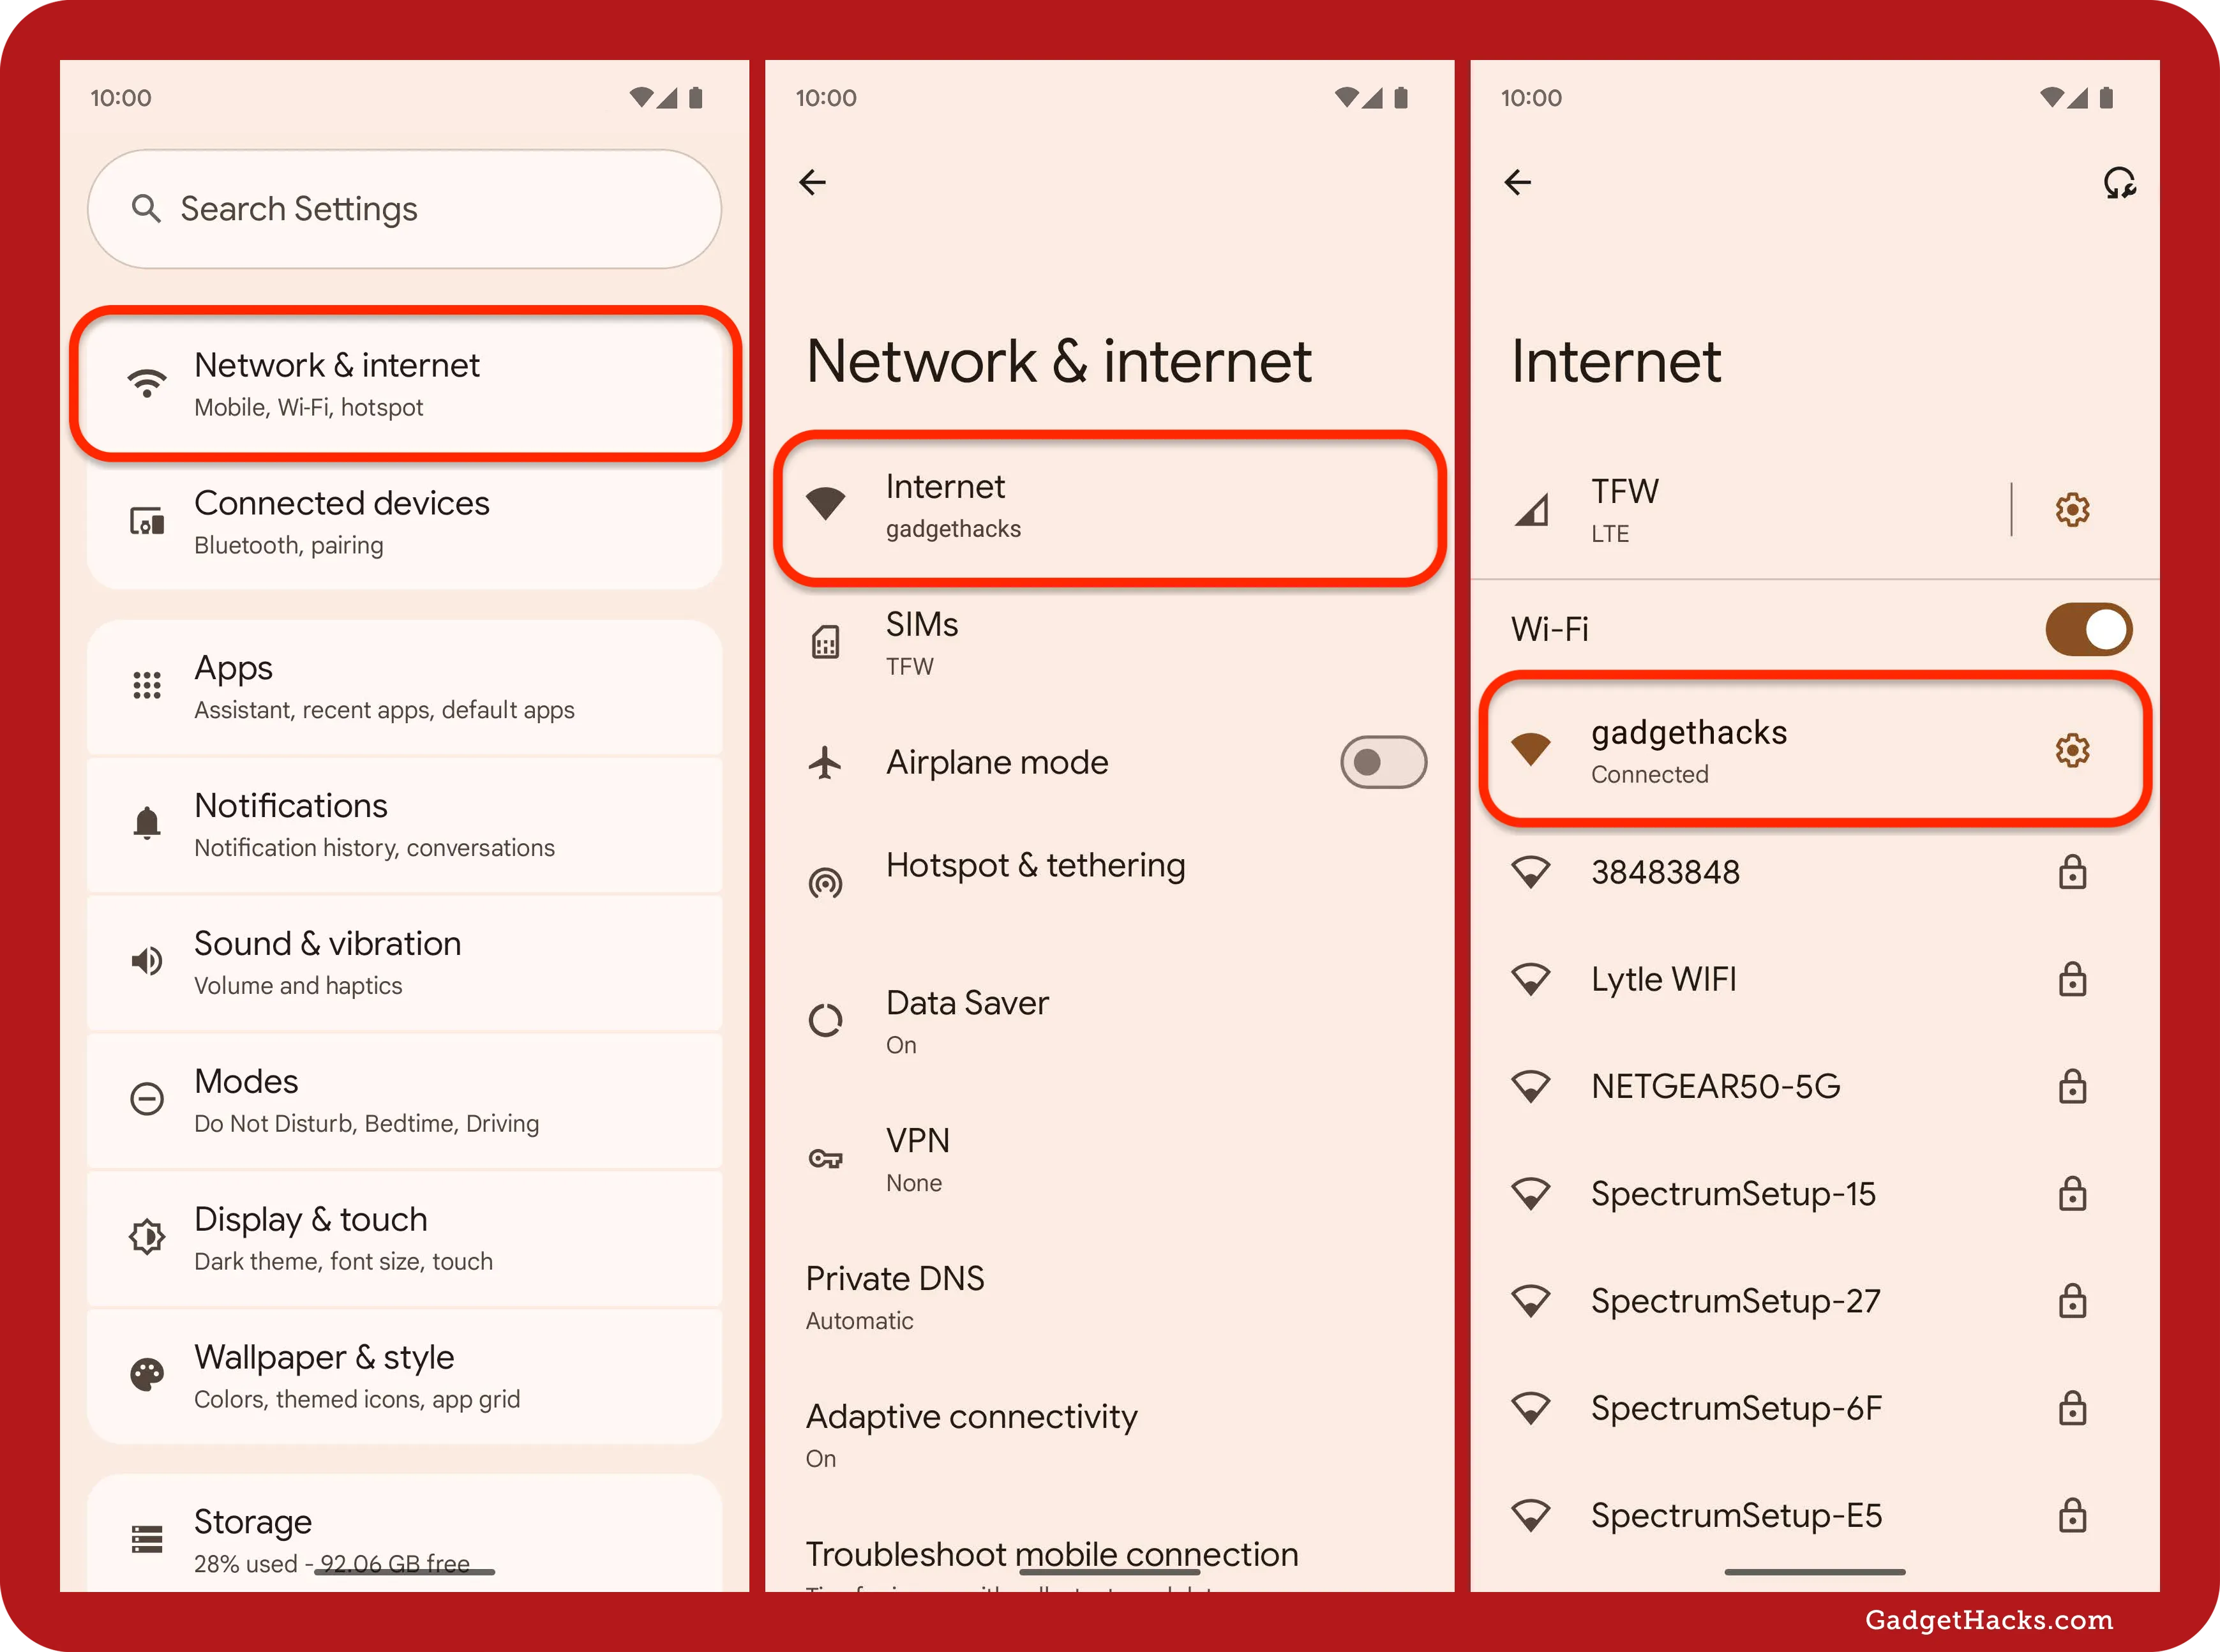
To choose another network, scroll down and select the Saved Networks option. The saved list shows the names of all the Wi-Fi network connections your device remembers. Pick the one you want to view.

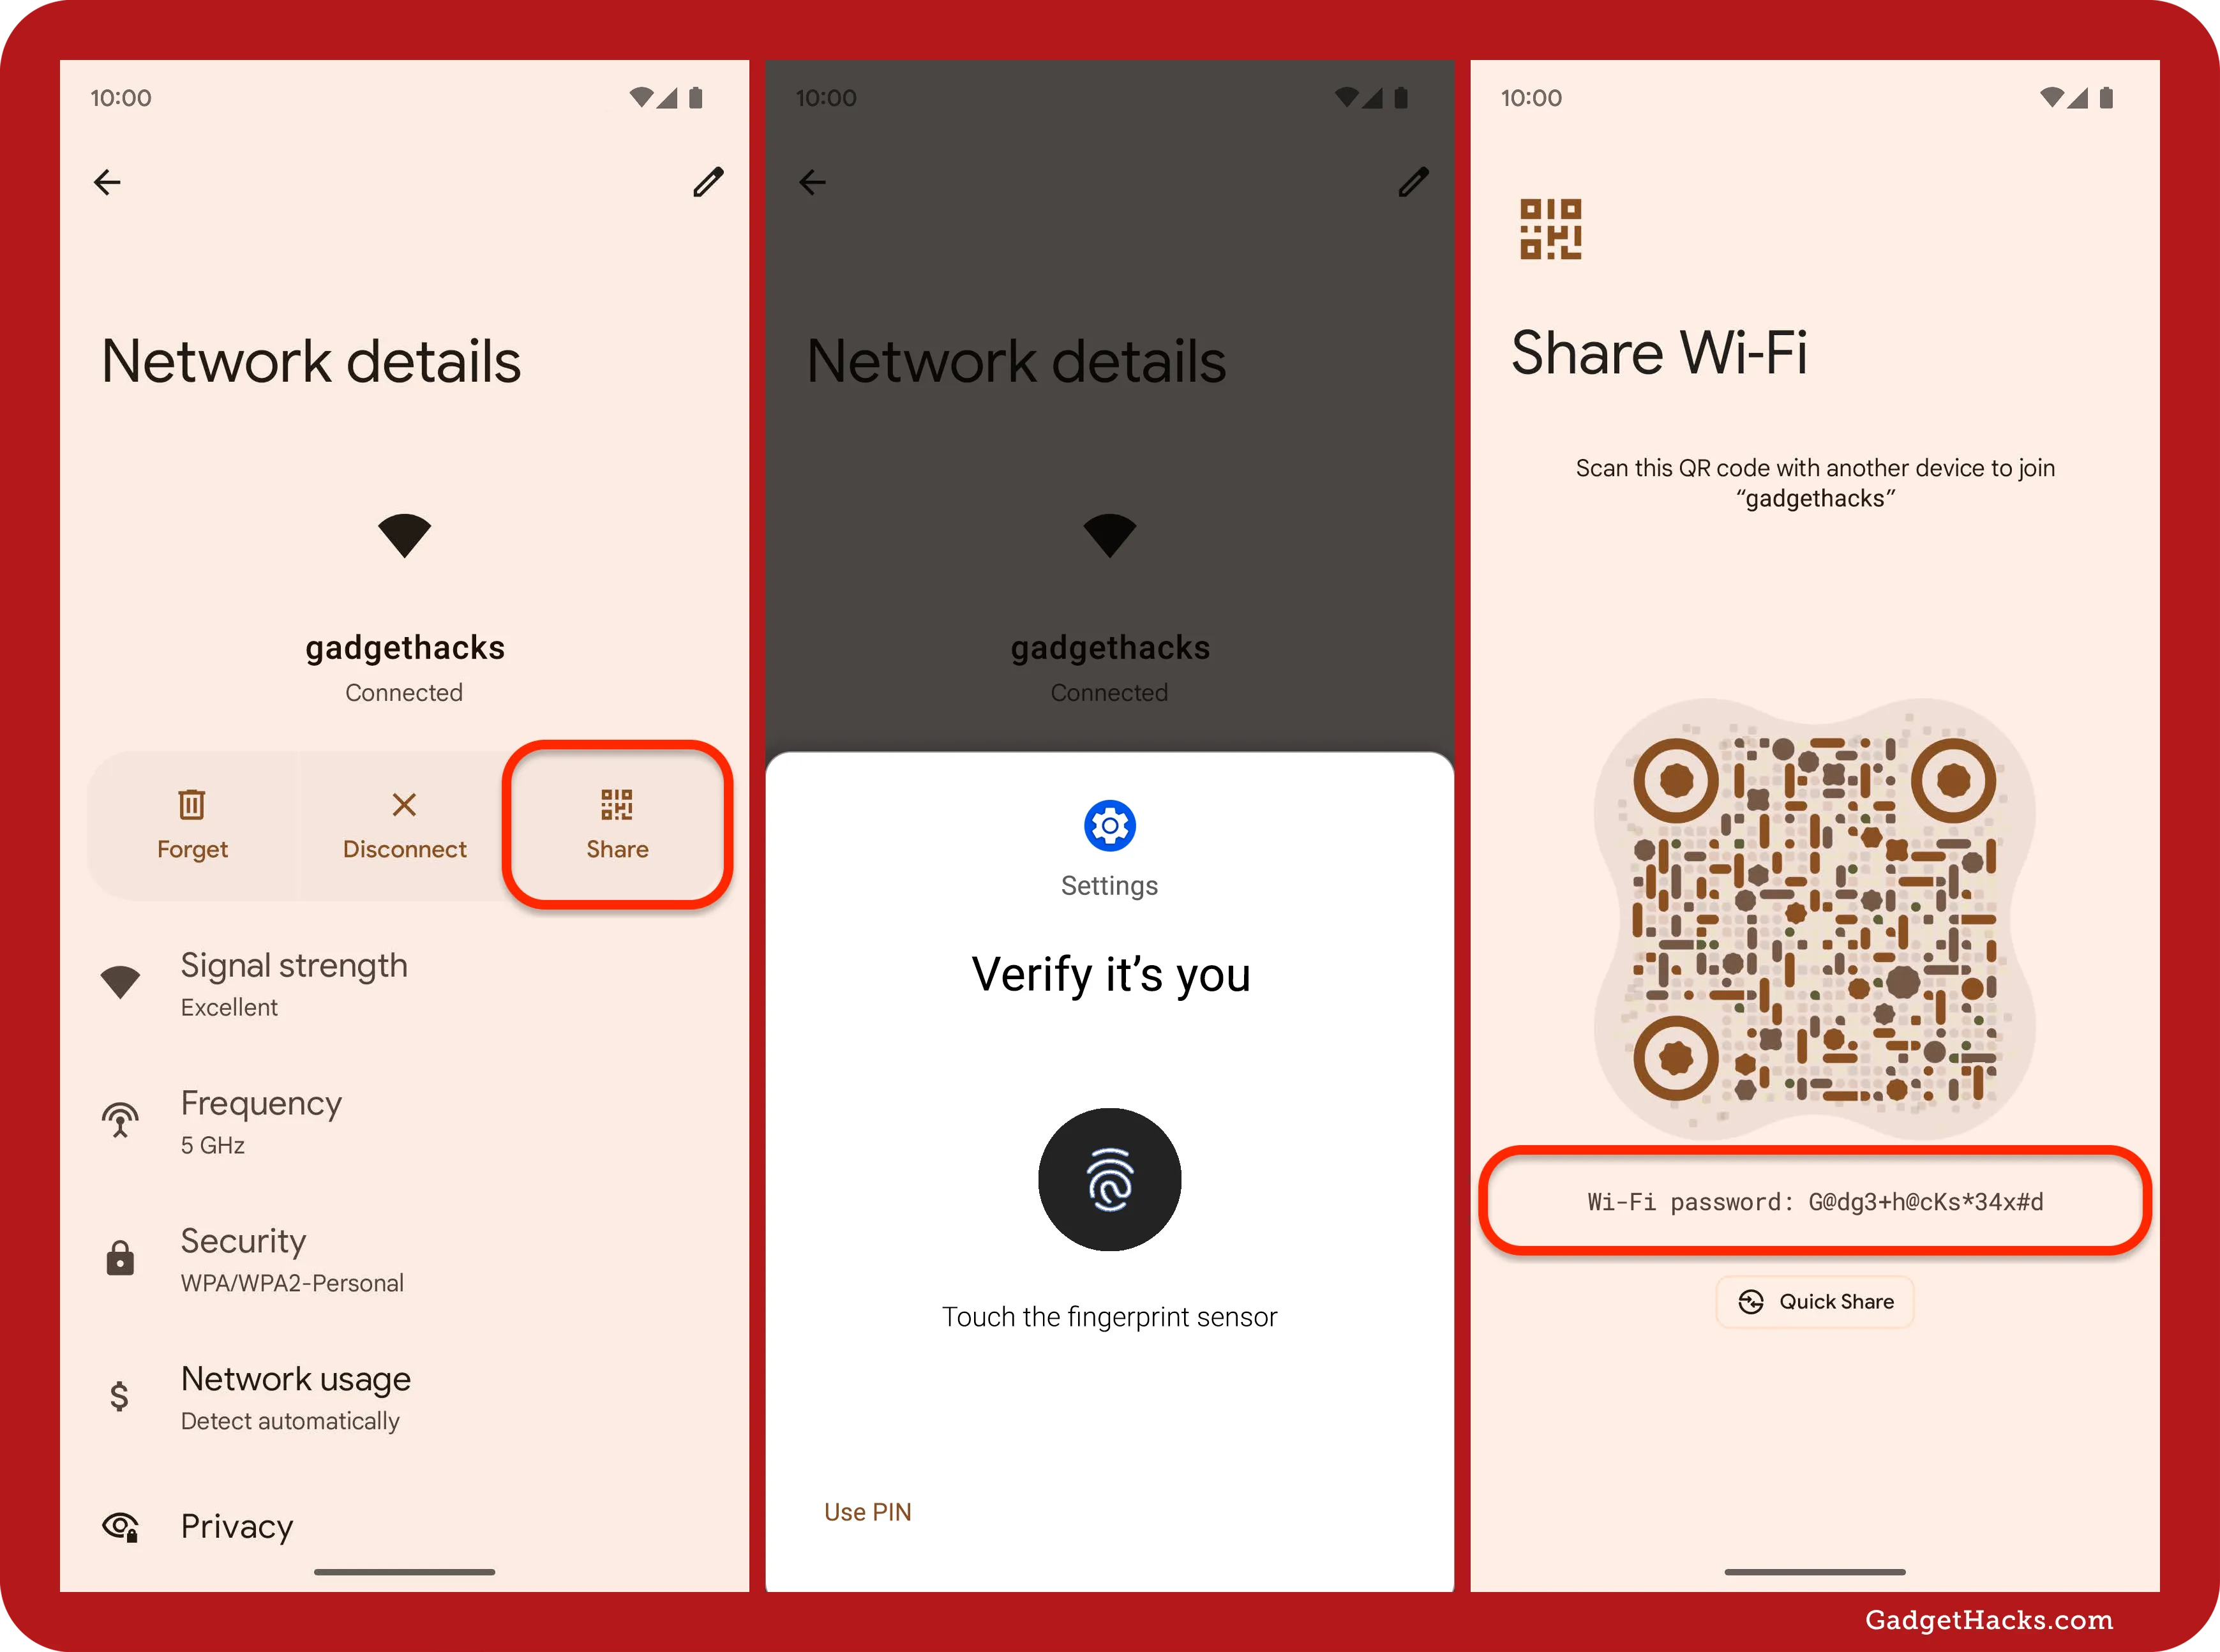
On the Network details page, hit Share, which shows an image of a QR code. It will ask you to authenticate with your fingerprint, face, PIN, or password. After that, the password will appear in plain text below the QR code that stores the network’s credentials.
You can also scan this QR code with another device — an Android phone/tablet, iPhone, or iPad — to connect that device to the access point instantly.
Android 14 to Android 15 on Samsung Galaxy devices
Samsung adds a skin called One UI to Android, with One UI 7 for Android 15 being the latest version as of April 2025. Many elements look and behave differently than on a Pixel, including how you view saved Wi-Fi passwords in plain text.
On One UI 6 and later, viewing Wi-Fi passwords is just as simple — maybe even simpler — than on stock Android.
Supported models include but are not limited to the Galaxy S21 and newer, Galaxy Z Fold 3 and newer, Galaxy Z Flip 3 and newer, Galaxy Tab S8 and newer, and various Galaxy A models.
Quick steps:
-
Open the Connections menu in Settings.
-
Tap the Wi-Fi submenu.
-
Tap the cog for the current network, or select a network via ⋮ » Advanced Settings » Manage Networks.
-
Tap the crossed-out eye icon in the password field.
-
See the plain text password.
Full instructions:
First, visit the Wi-Fi submenu in your Settings app. You can:
-
Ask Bixby to “open Wi-Fi settings.”
-
Ask Google Assistant or Gemini to “open Wi-Fi settings.”
-
Long-press the Wi-Fi symbol in the Quick Settings and tap Details.
-
Search for “wifi” in Settings and tap the Wi-Fi result.
-
Go to Settings » Connections » Wi-Fi.
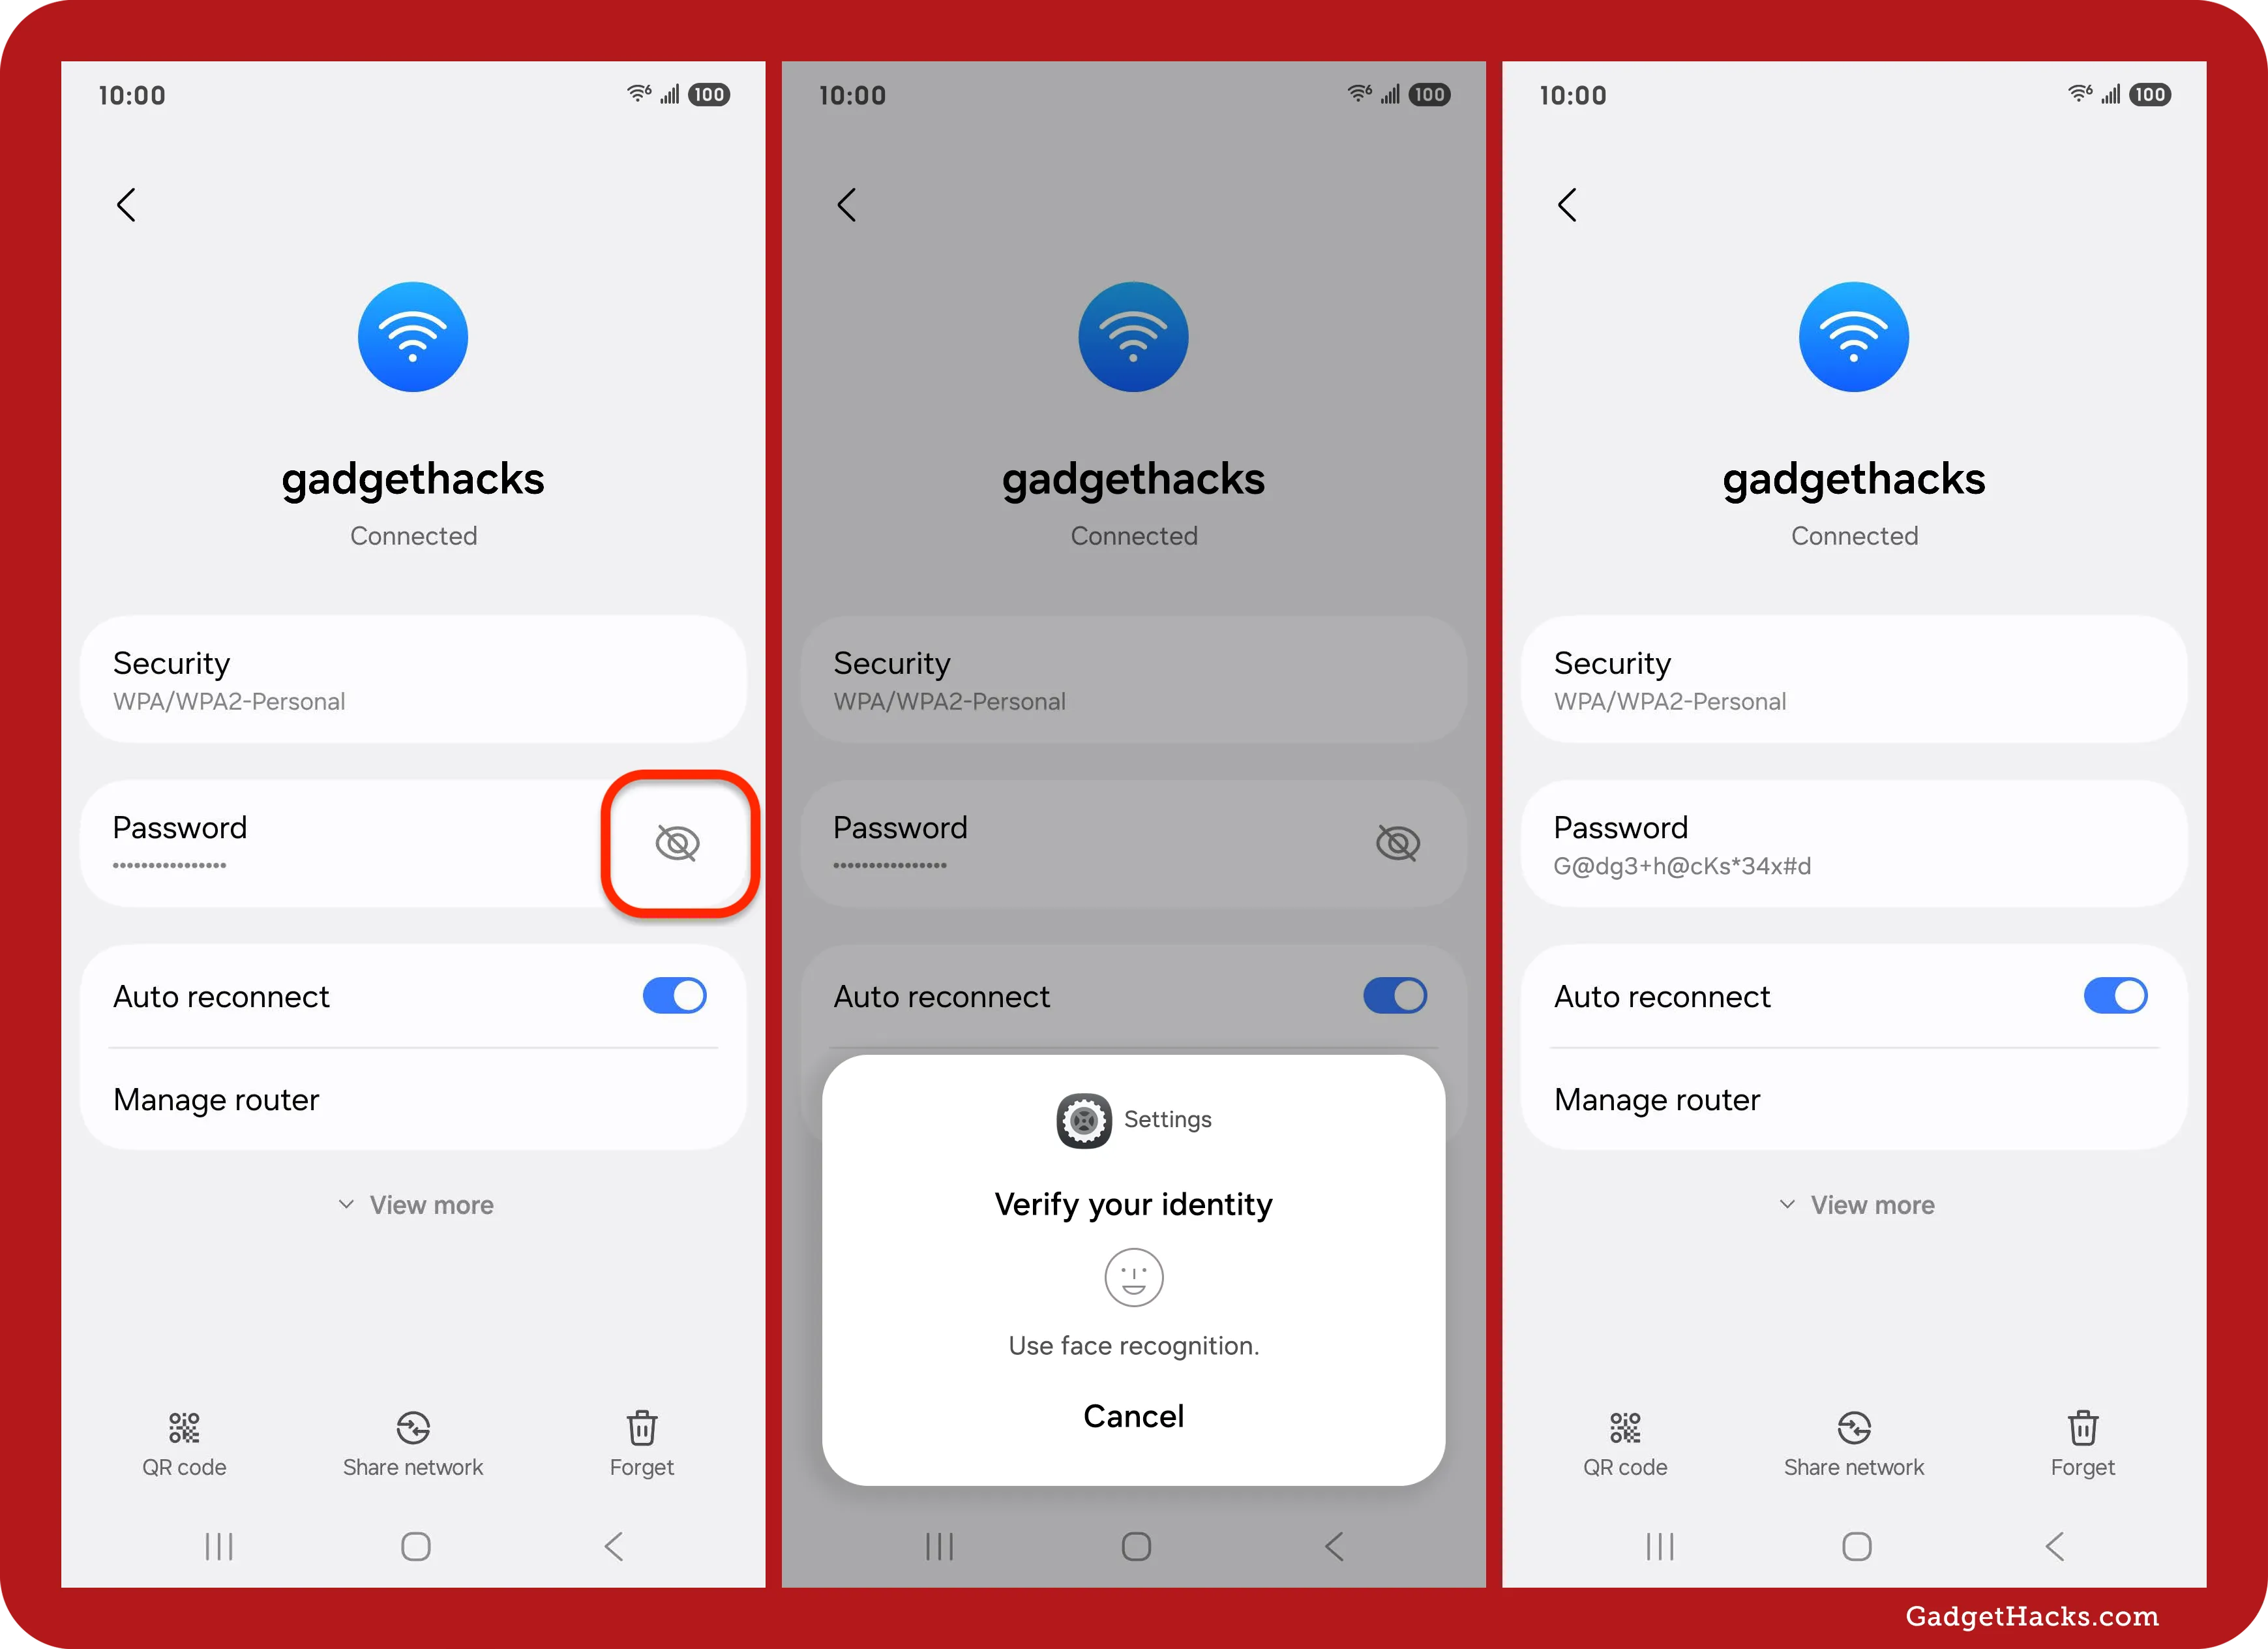
On the Wi-Fi submenu, tap the cog next to the network name you’re connected to. Alternatively, you can choose another saved network.

To pick another saved Wi-Fi network, tap the vertical ellipsis (⋮) in the Wi-Fi preferences, select Advanced Settings, choose Manage Networks, and pick the connection needed.

Tap the crossed-out eye icon in the password field on the network’s details.
Verify your identity (face, fingerprint, PIN, password, or pattern), and the password will appear in plain text, completely unobfuscated.
Android 10 to Android 13 on Samsung Galaxy devices
On older Samsung Galaxy models that can’t run One UI 6 or later, revealing a Wi-Fi password is a little trickier. It’s similar to stock Android but takes a few extra steps. The downside? You can only view the password for the currently connected network. This applies to Galaxy devices running Android 10 to Android 13 (One UI 2 to One UI 5).
This process also works on Android 14 and later (One UI 7 and later), but it requires more work than the newer method.
Quick steps:
-
Open the Connections menu in Settings.
-
Tap the Wi-Fi submenu.
-
Tap the cog for the current network.
-
Tap QR code.
-
Tap Save As Image to add it to your gallery.
-
Open Google Lens, or open the image in Google Photos.
-
Open the image in Google Lens, or tap the Lens icon in Google Photos.
-
See the plain text password in the results.
Full instructions:
First, visit the Wi-Fi submenu in your Settings app. You can:
-
Ask Bixby to “open Wi-Fi settings.”
-
Ask Google Assistant or Gemini to “open Wi-Fi settings.”
-
Long-press the Wi-Fi symbol in the Quick Settings.
-
Search for “wifi” in Settings, then tap the Wi-Fi result.
-
Go to Settings » Connections » Wi-Fi.
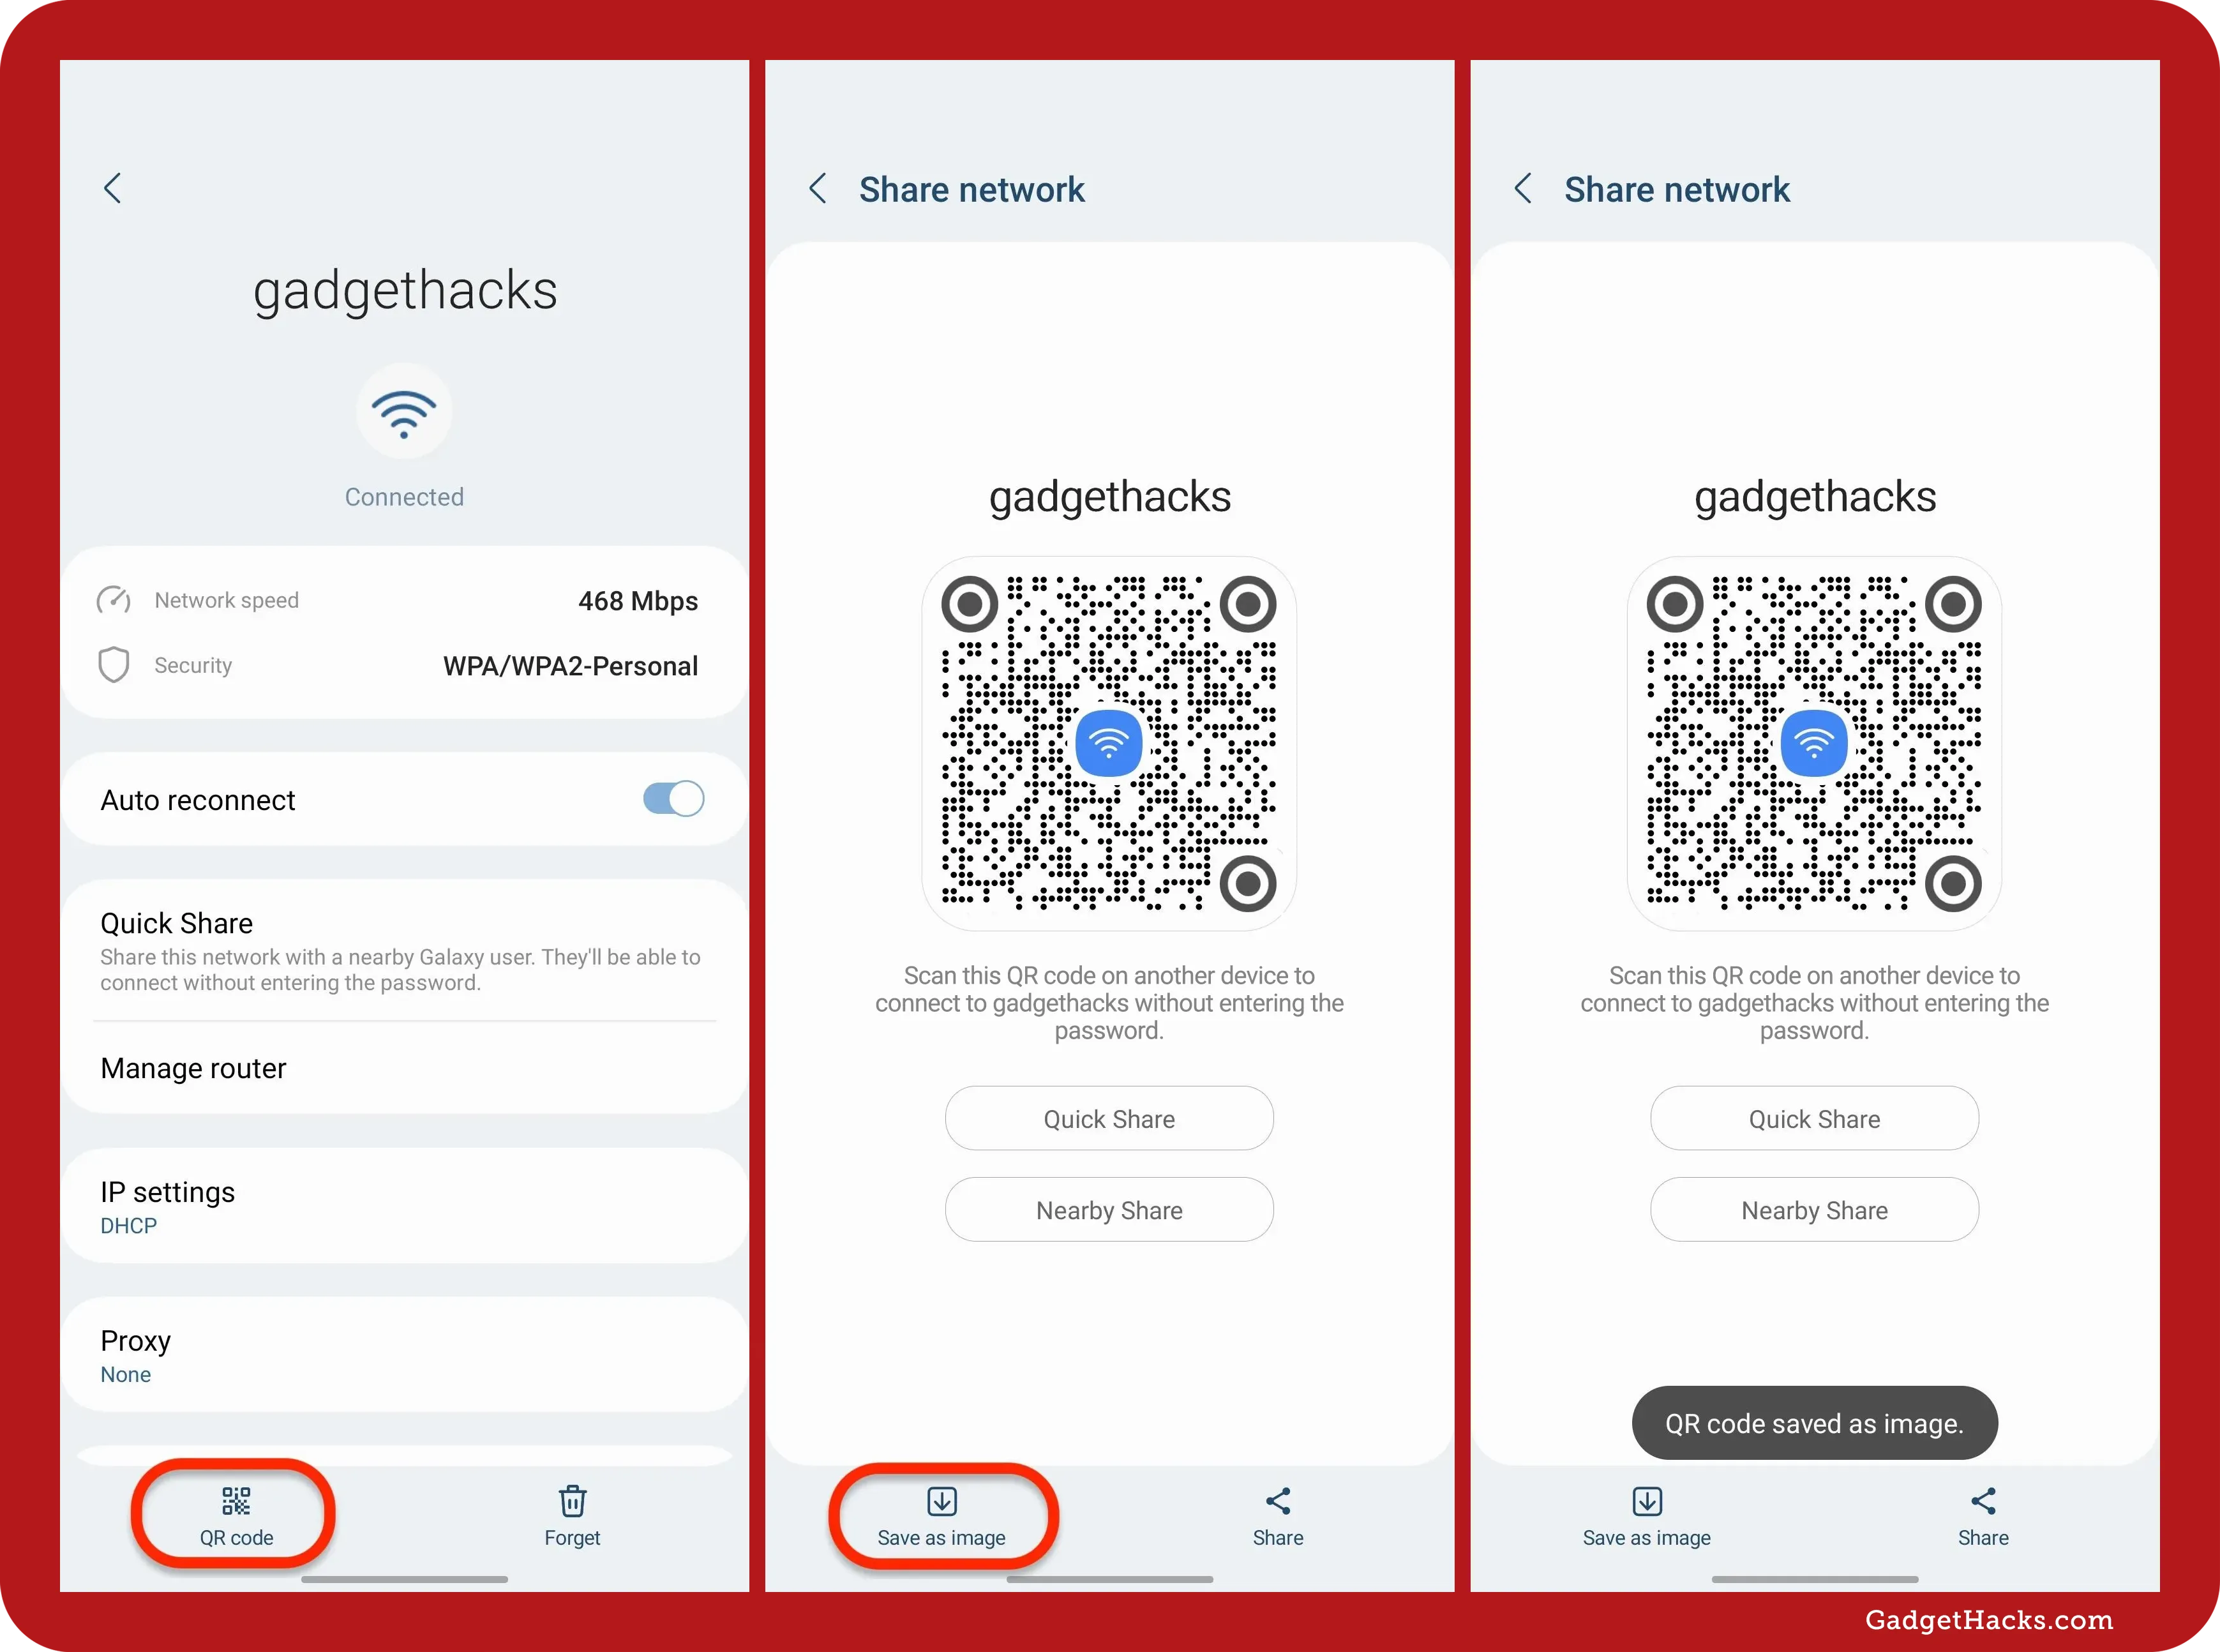
On the Wi-Fi submenu, tap the gear next to the network name you’re connected to.

Next, select QR Code at the bottom of the network’s details to generate the QR code for your current connection. When it appears, tap Save As Image to store it in your photo gallery.
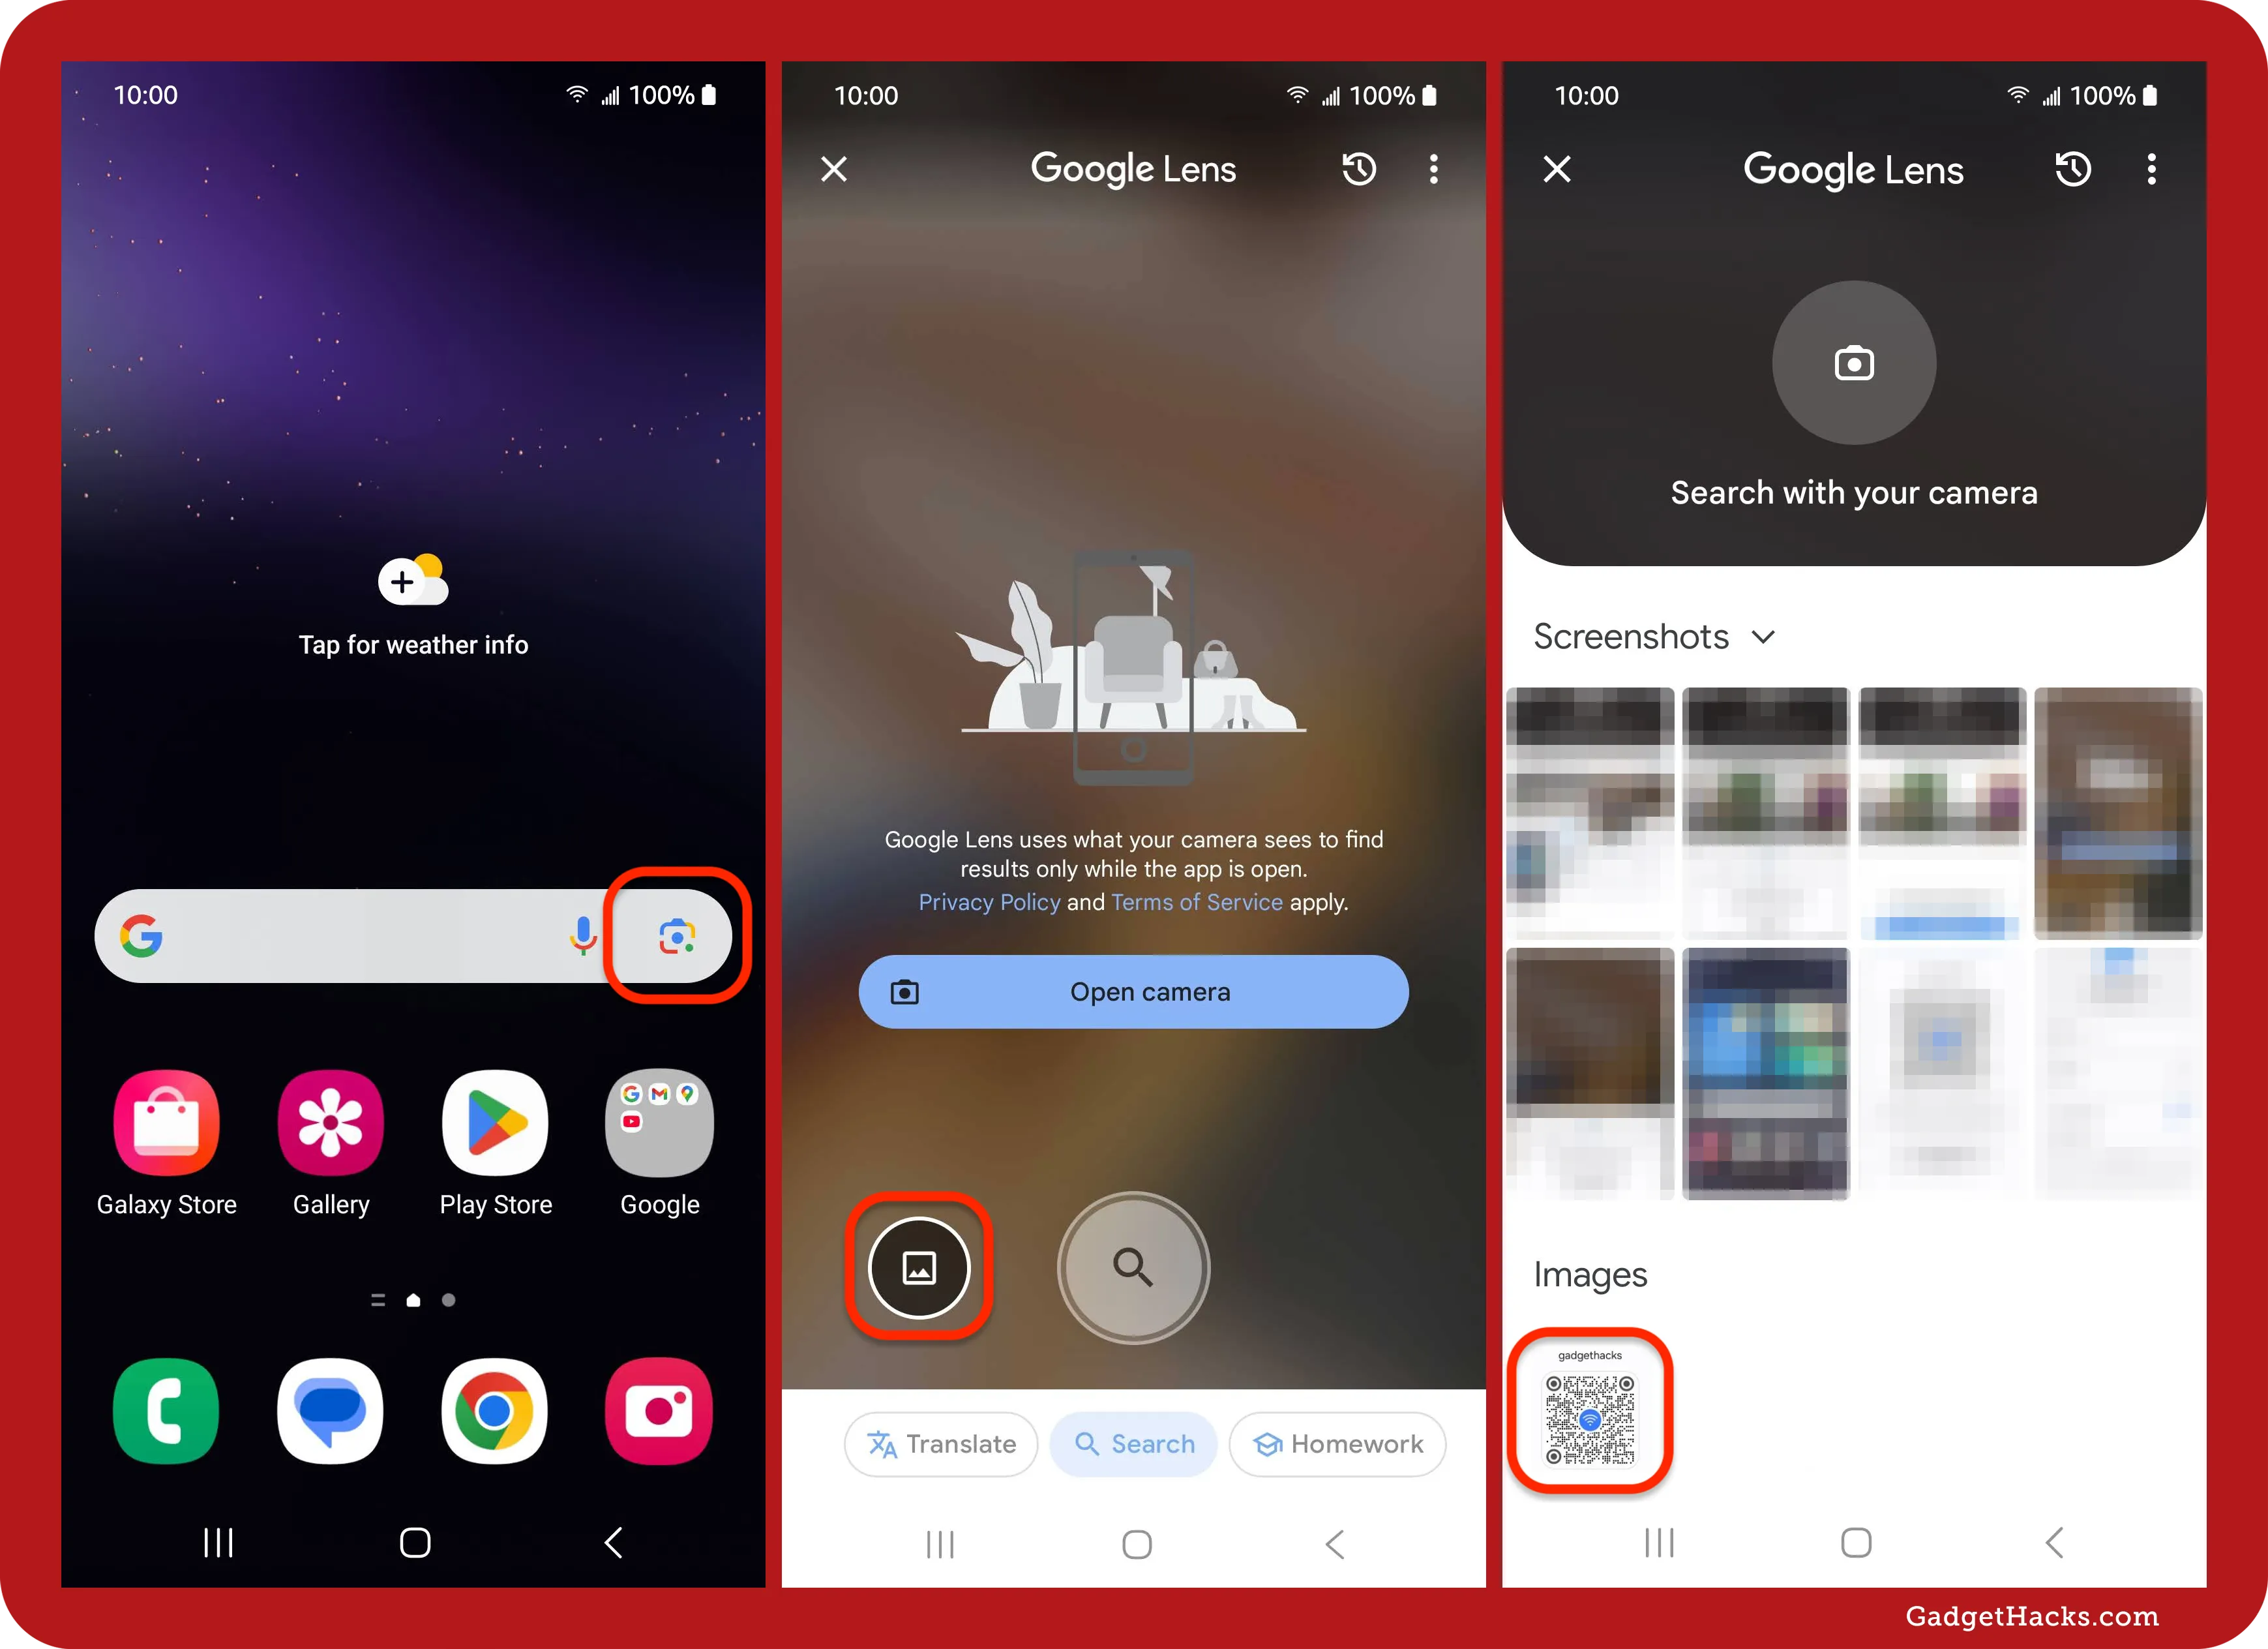
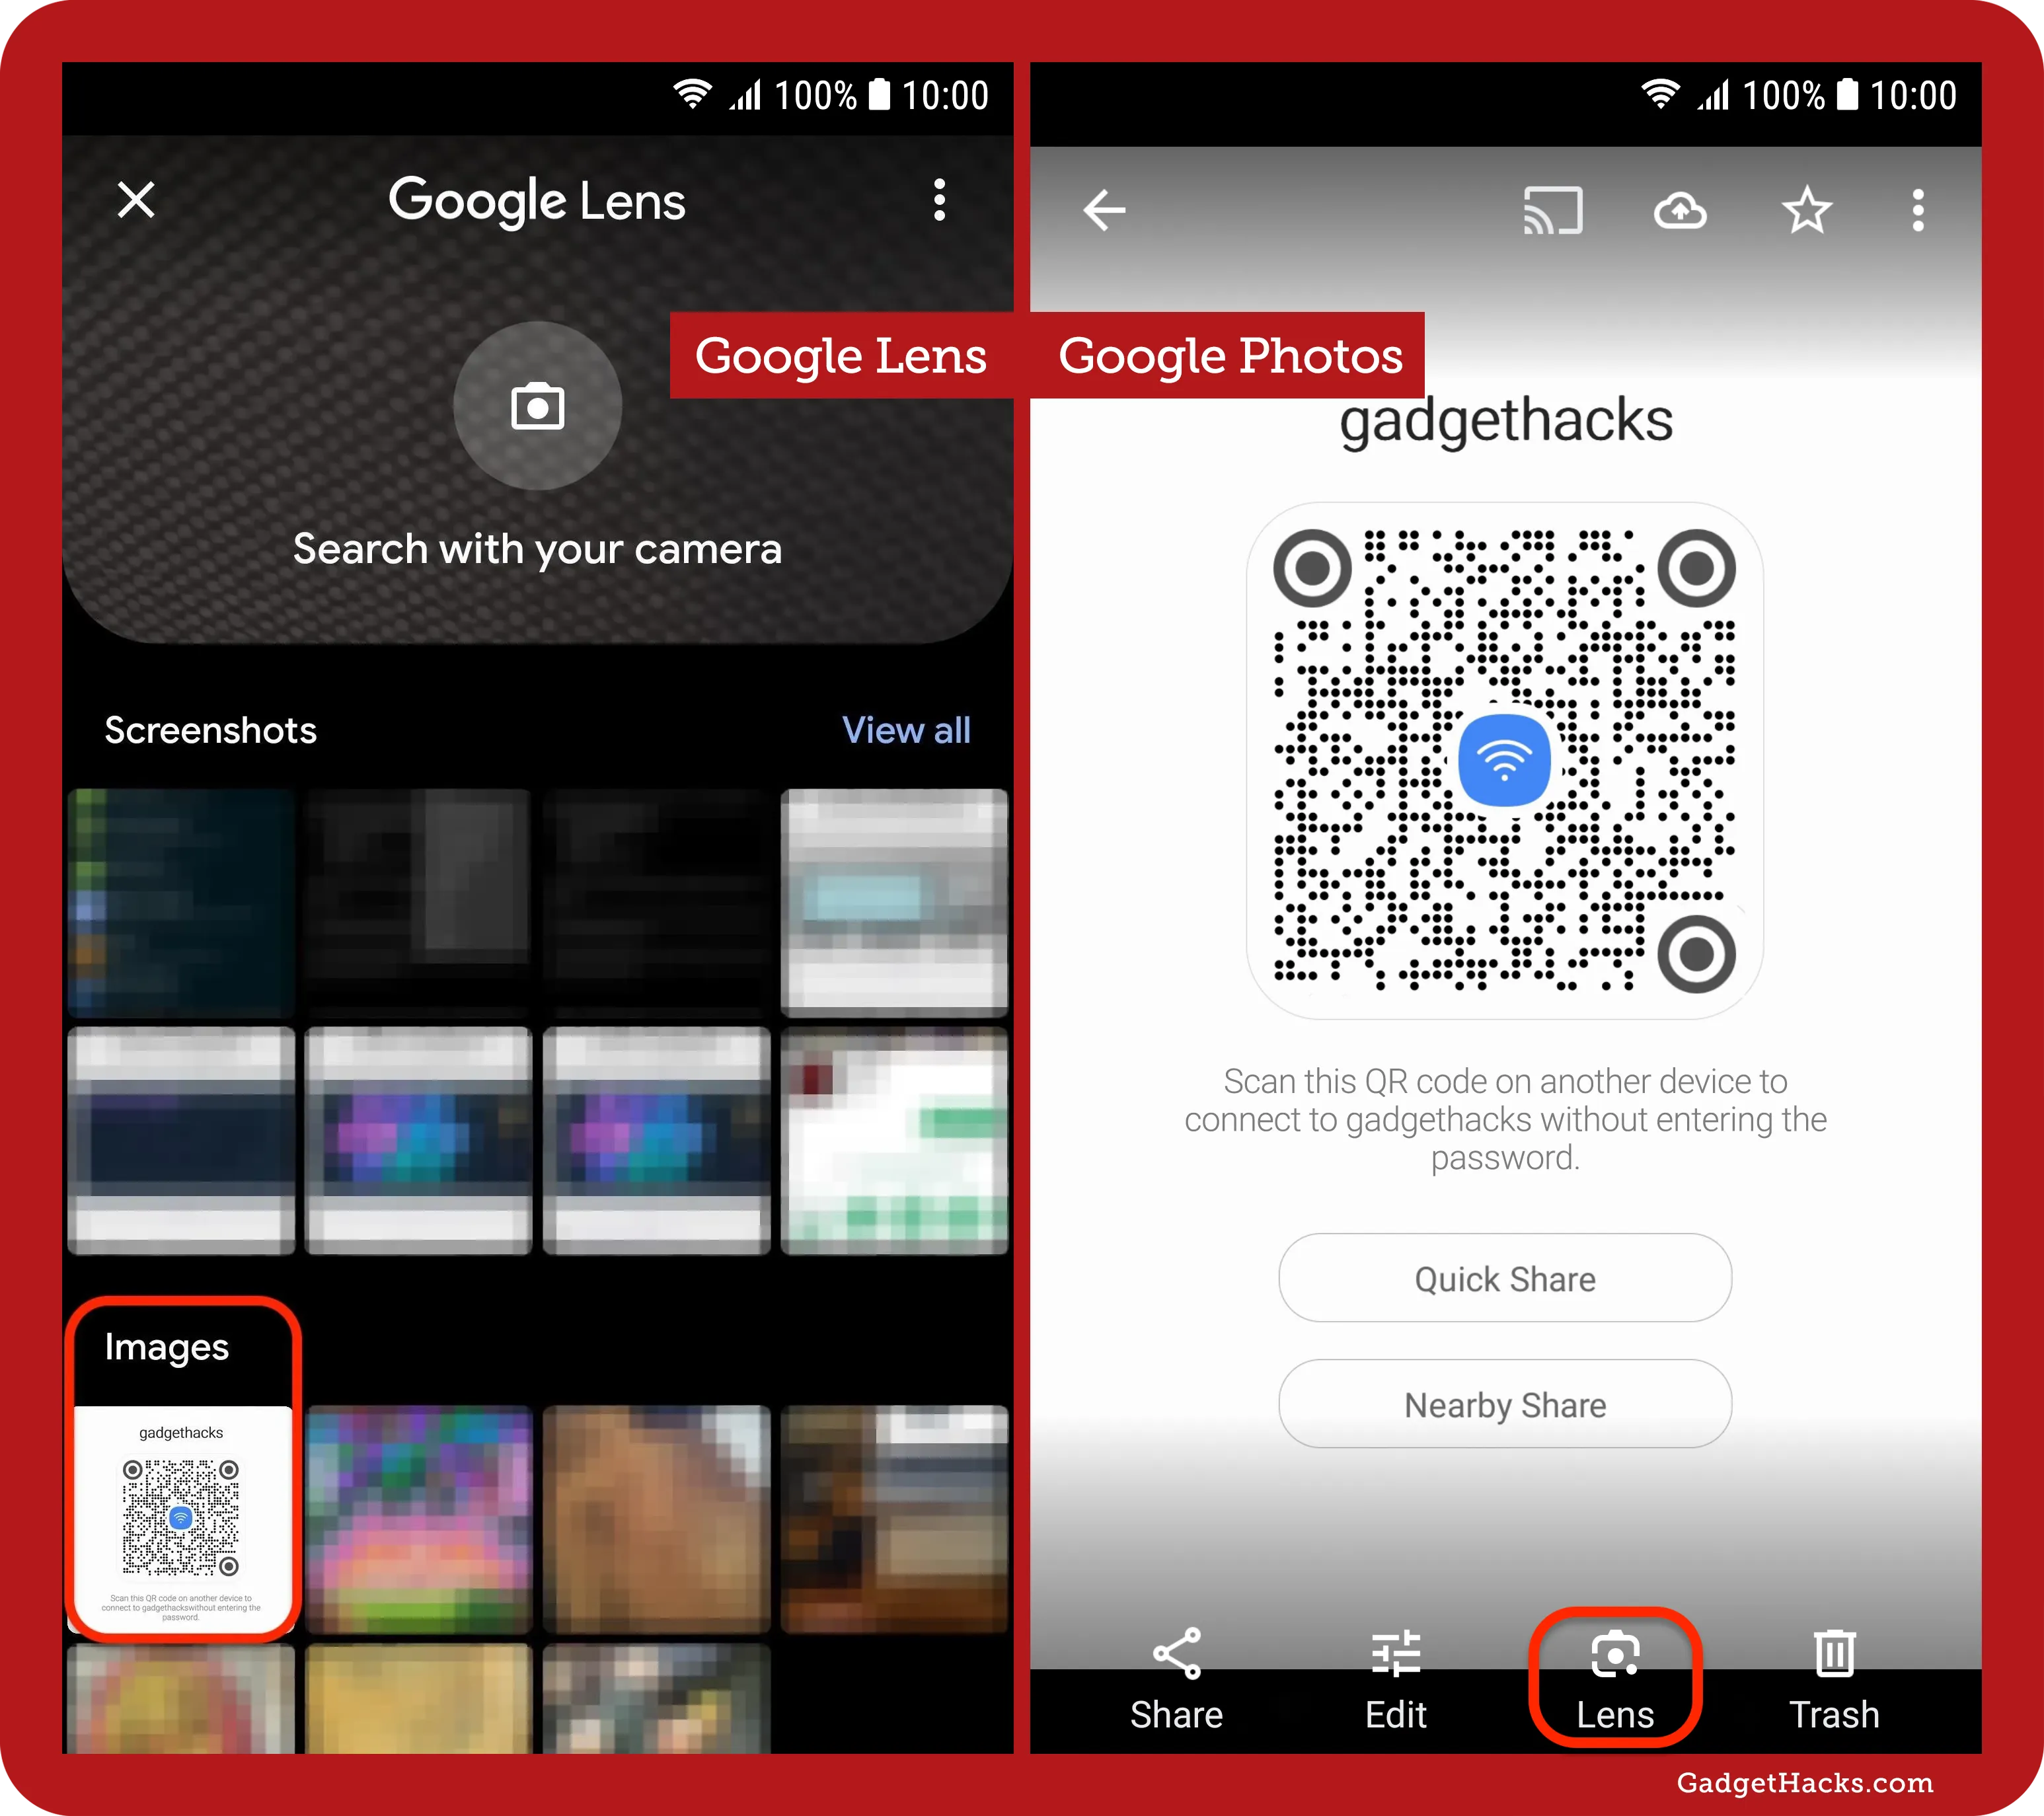
Next, use Google Lens to scan the saved image. You can do this in various ways:
-
Open Google Photos, select the image, and hit the Lens button.
-
Tap the camera button on the Google app‘s home screen widget, hit the gallery icon, and then select the saved image.
-
Open the Google app, tap the camera or AI Mode icon in the search bar, hit the gallery icon, and then select the saved image.
-
Open the Google Lens app, hit the gallery icon, and then select the saved image.
If it’s the first time using Google Lens to scan your images, give it permission to access your gallery when asked.
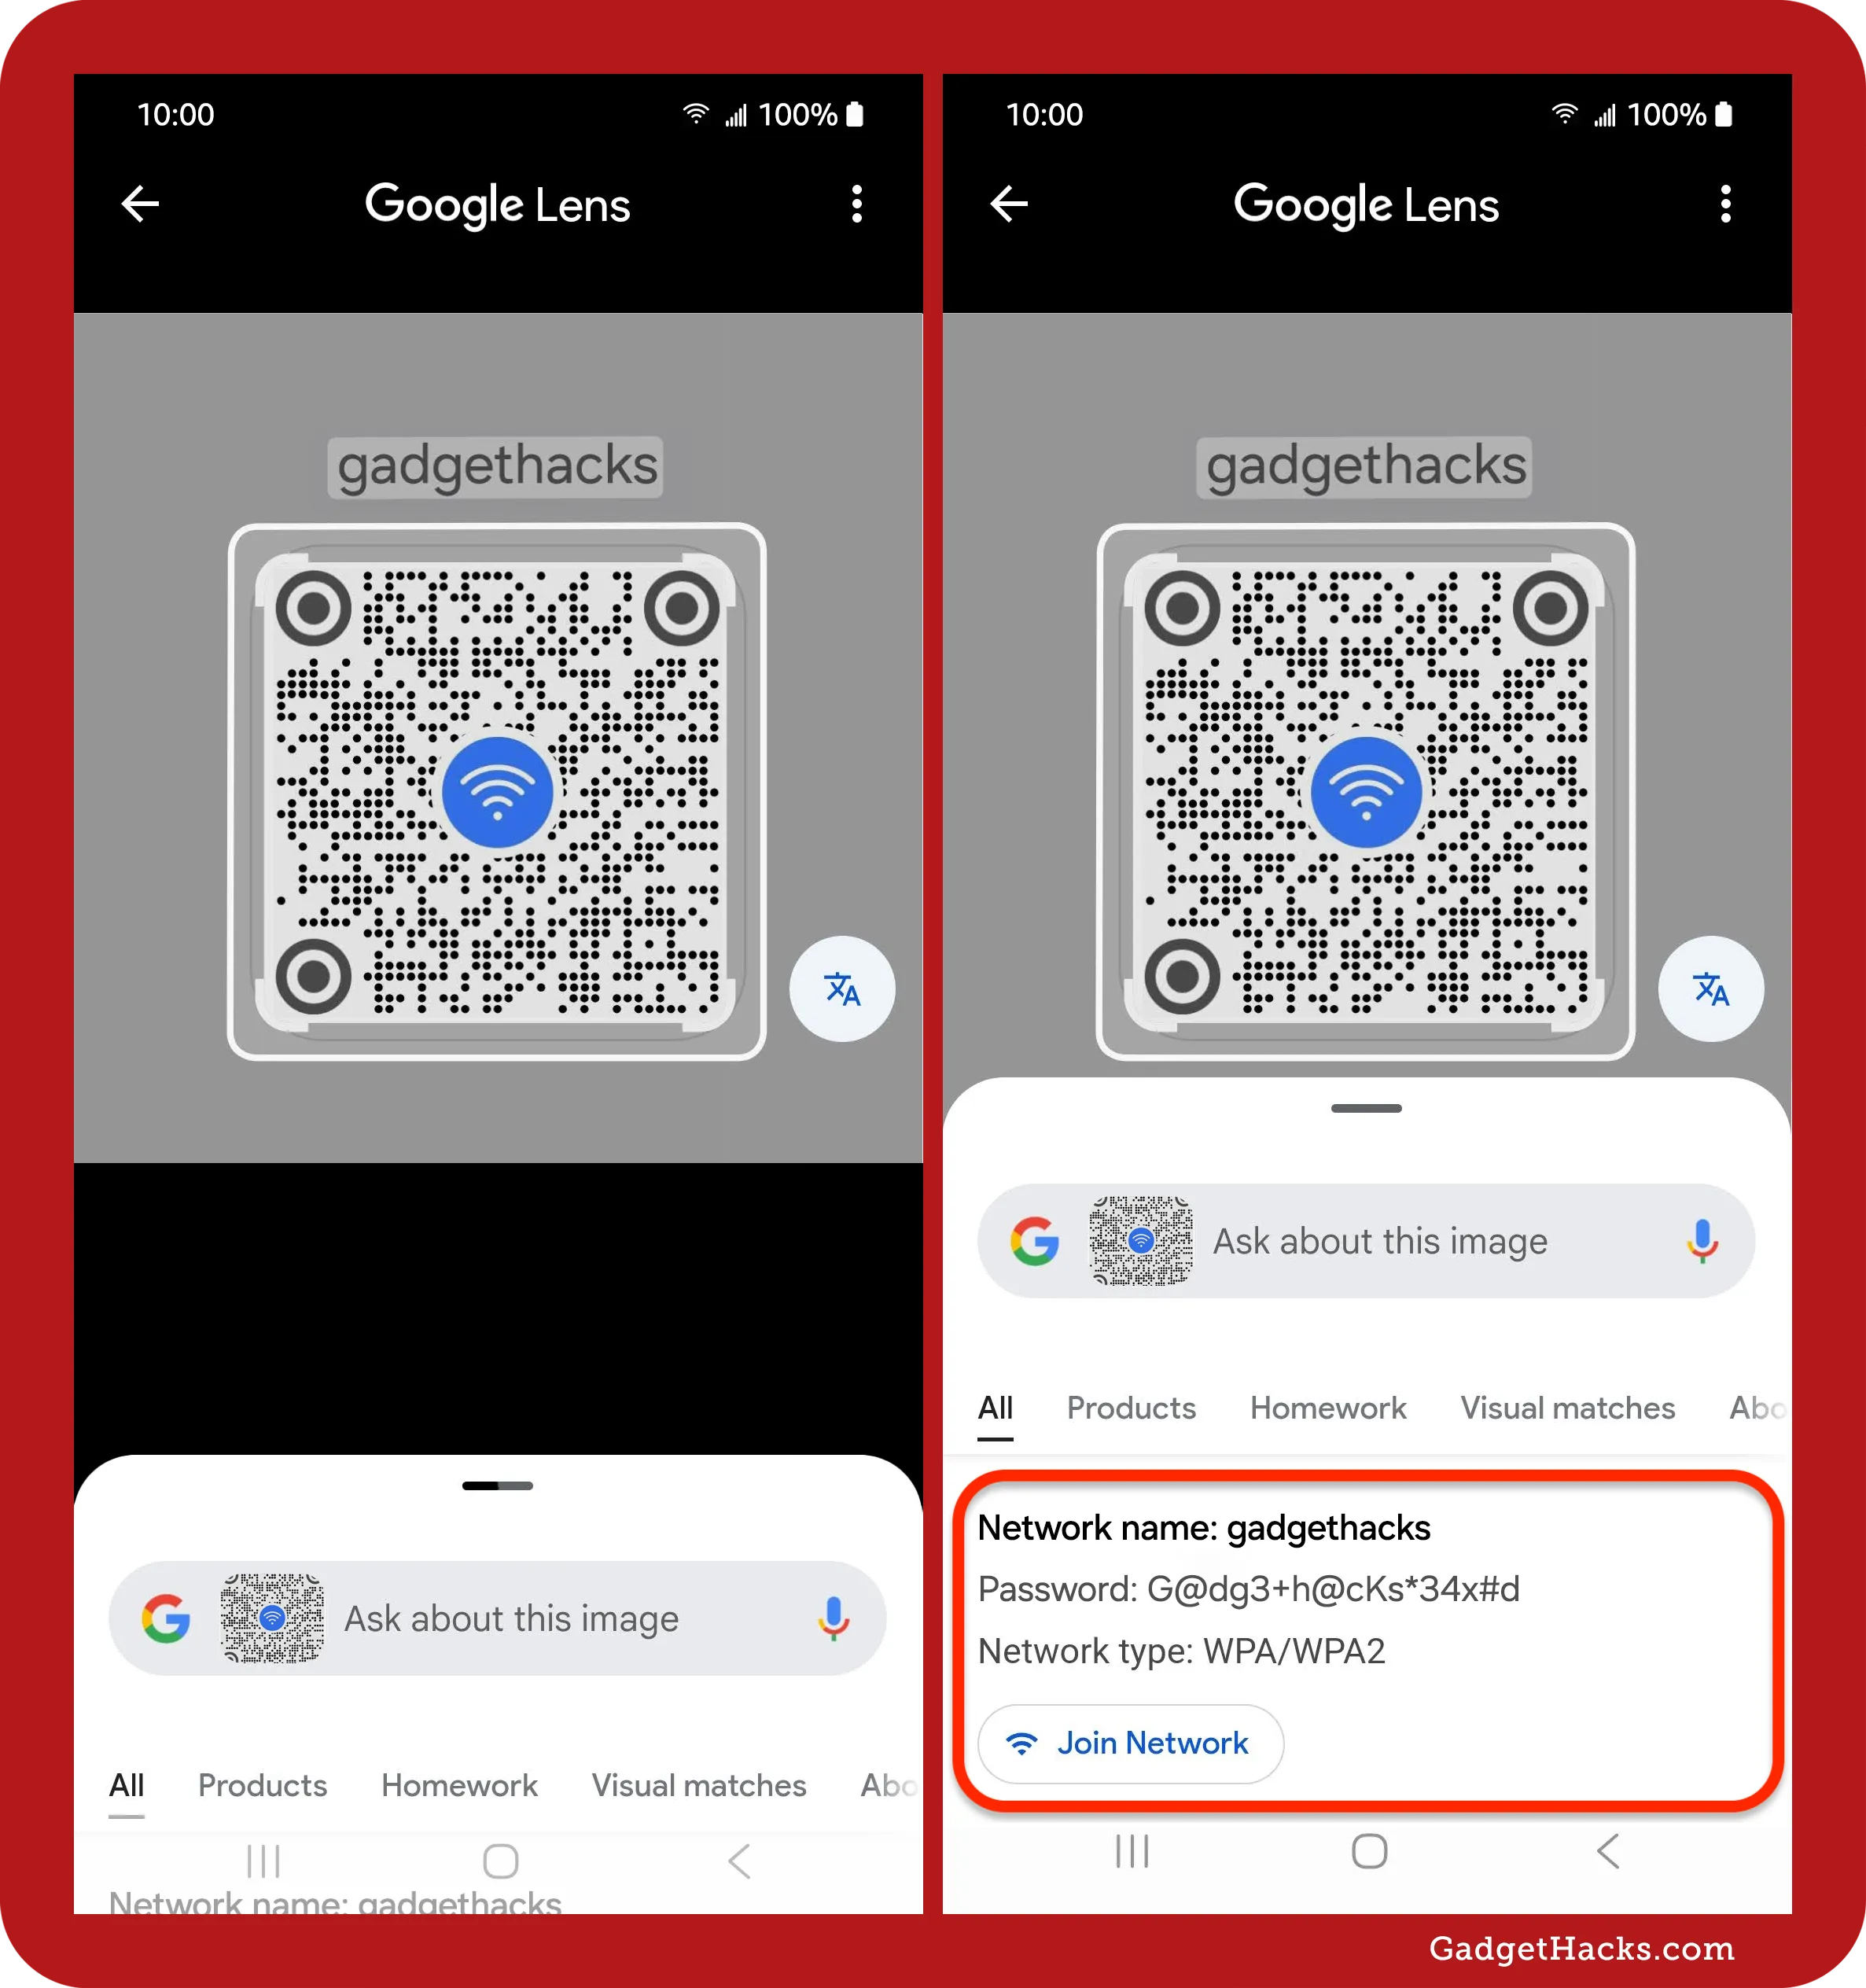
If needed, expand the crop area to capture the entire QR code. Google Lens often focuses only on the QR code’s internal data, which might not reveal the network credentials. Expanding the crop can fix that.
When successful, it will show the network password in plain text in the results.
Android 6 to Android 9 on non-rooted devices
On Android 9 and earlier, you can’t generate a QR code with the Wi-Fi password unless you already know it. And the saved network config files are protected unless your device is rooted (see Method 5).
However, if someone gives you a QR code for a Wi-Fi access point, you can still scan it with Google Lens, Google Photos, or a third-party QR code scanner, as described below.
Quick steps for Google Lens:
-
Open the Google Lens app, or tap the Lens icon in the Google app or Google app’s home screen widget.
-
Select the image from your gallery, or choose Search With Your Camera and snap a picture of the code.
-
Pull up the results to see the plain text password.
Quick steps for Google Photos:
-
Open the Google Photos app.
-
Select the image from your gallery.
-
Tap Lens on the image.
-
Pull up the results to see the plain text password.
Full instructions:
First, open either Google Lens or Google Photos. For Google Lens, you can open its app directly, tap the Lens icon on the Google app’s home screen widget, or tap the Lens icon from within the Google app itself.
Next, select the image with the QR code from your gallery. In the Google Lens app, you can also choose Search With Your Camera if the QR code is printed out or on another device; if so, scan the code with your camera. On Google Photos, tap the Lens button once you load the image.
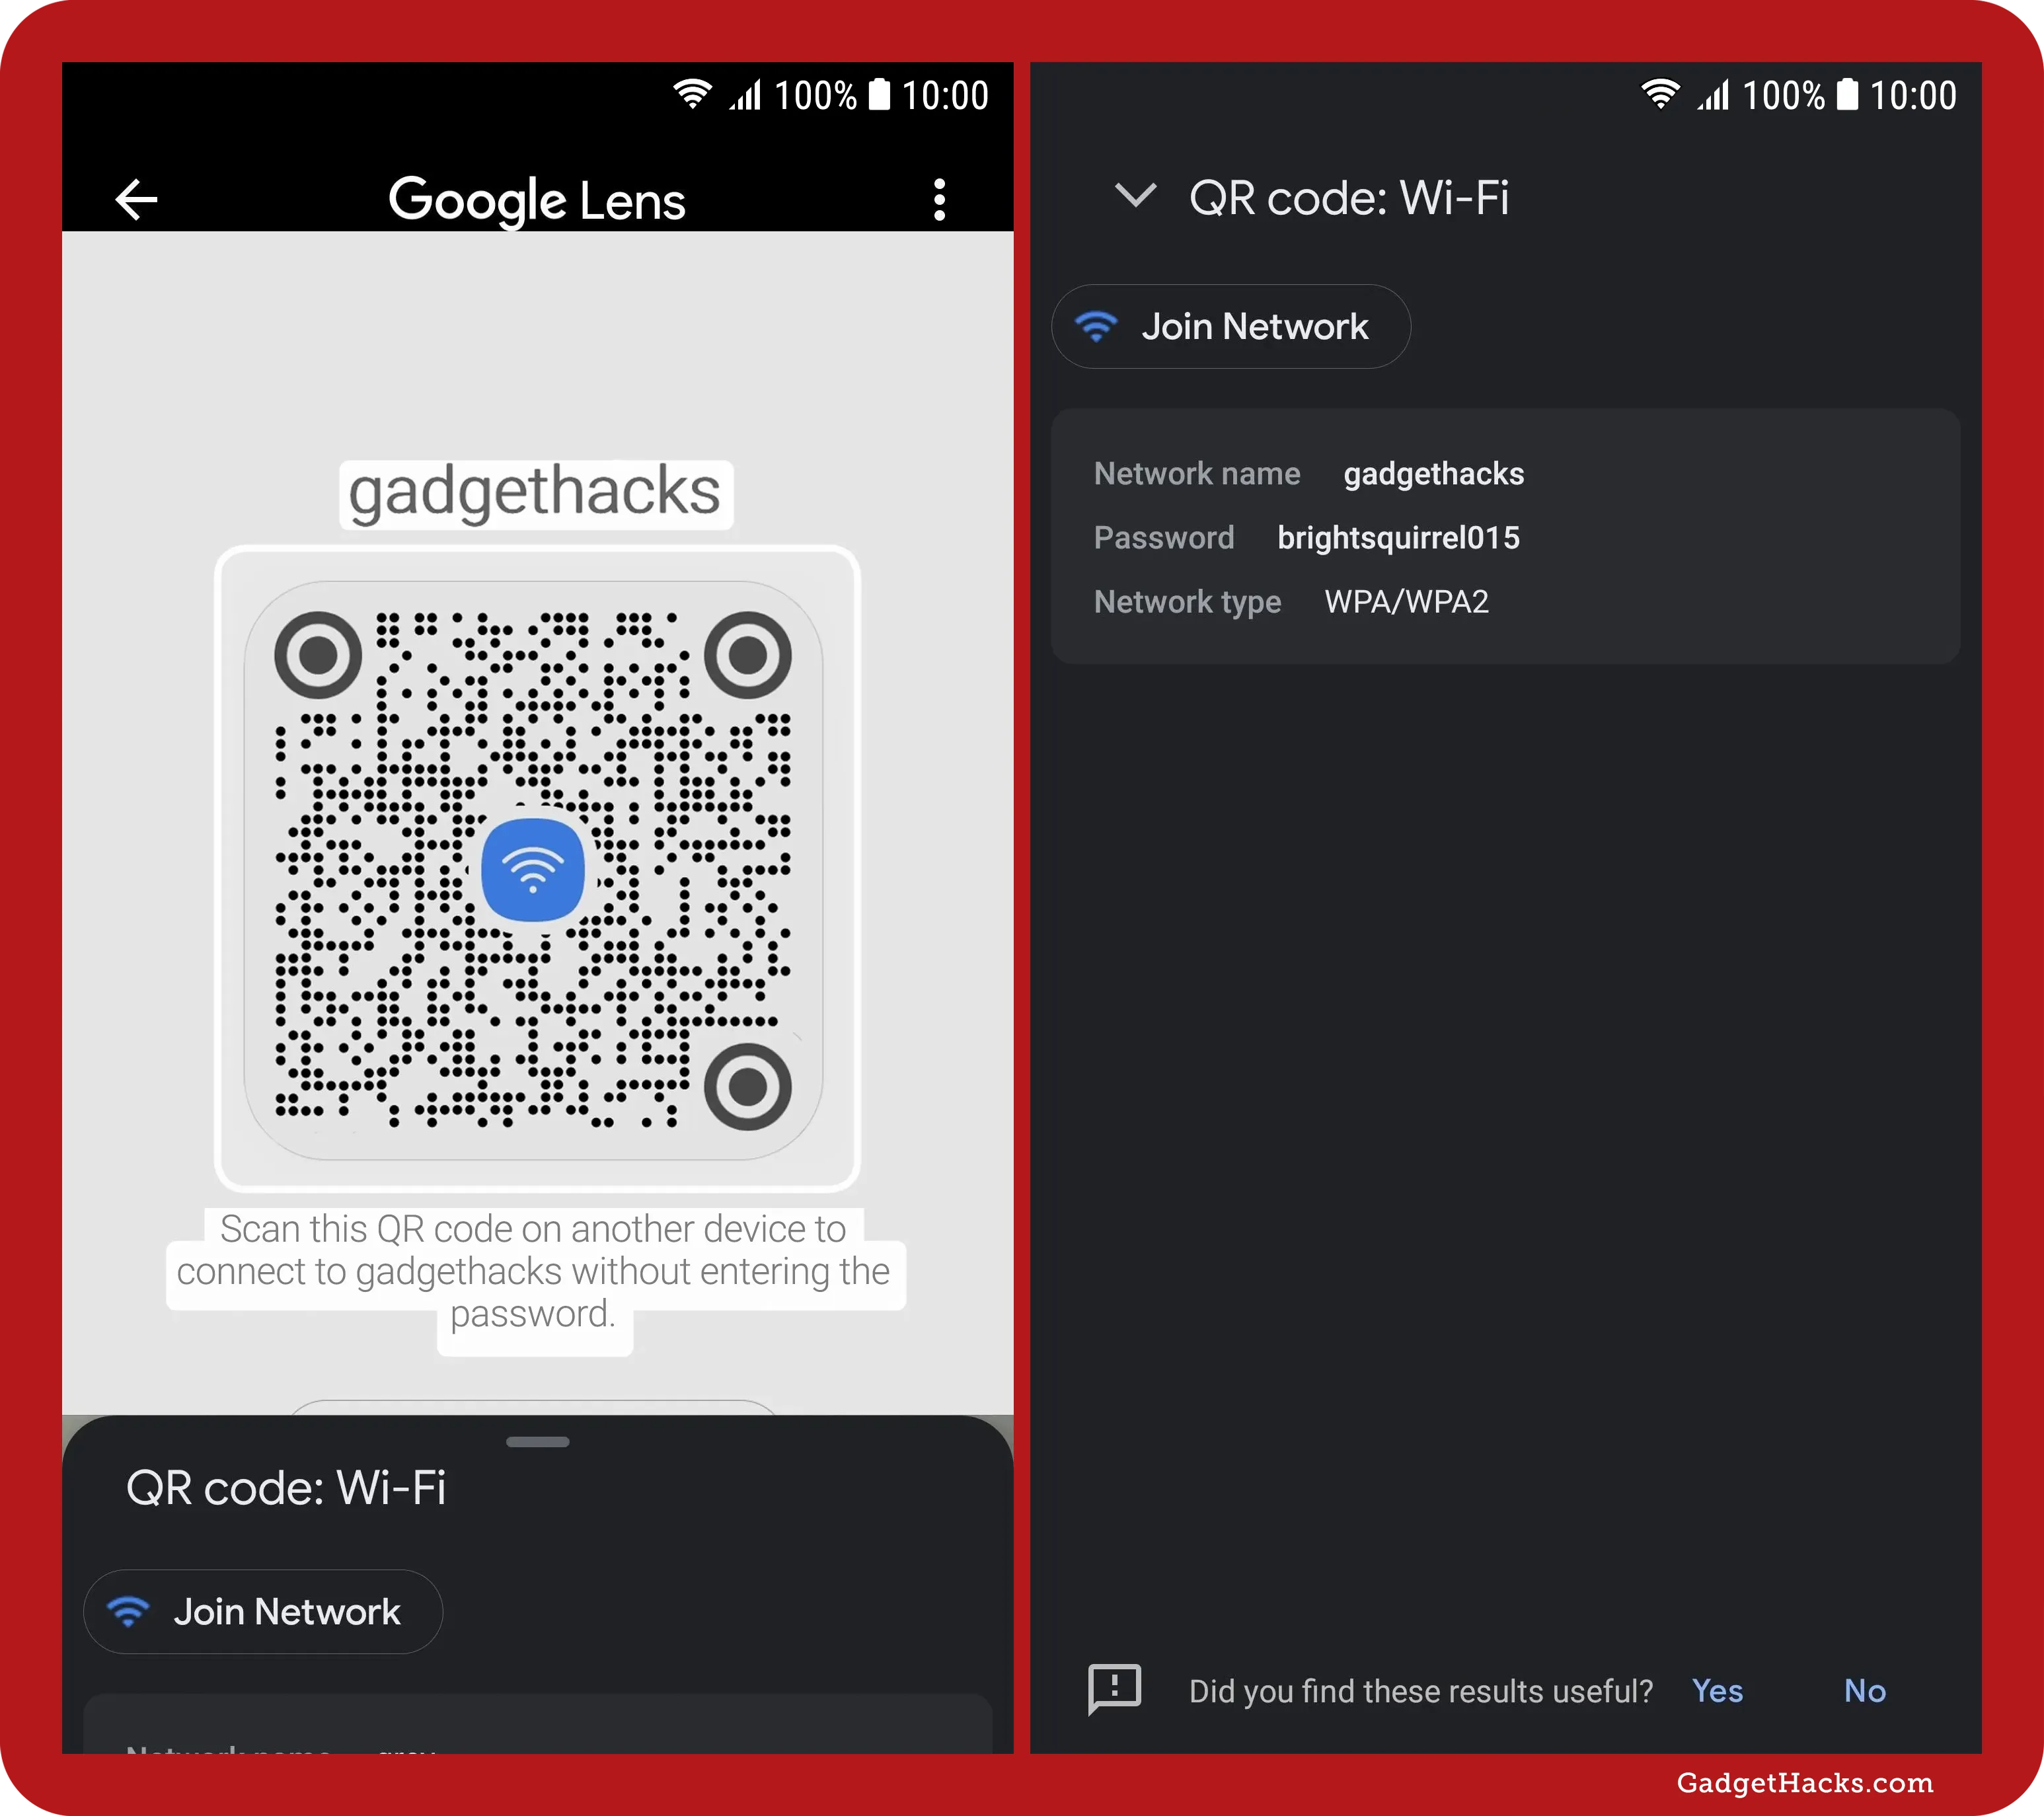
Google Lens will then scan the image. If needed, expand the crop area to capture the whole QR code. Google Lens often focuses only on the QR code’s internal data, which might not reveal the network credentials. Expanding the crop can fix that.
When successful, the network password will appear in plain text in the results. You may need to pull up the card to view the full details.
Android 4.4 to Android 9 on rooted devices
If your phone is running Android 9.0 Pie or earlier and you want to view the passwords for your saved Wi-Fi networks, the only way to do so is with a root app. When rooted, install a third-party Wi-Fi password viewer such as WiFi Key Recovery (needs root) or WiFi Password Show.
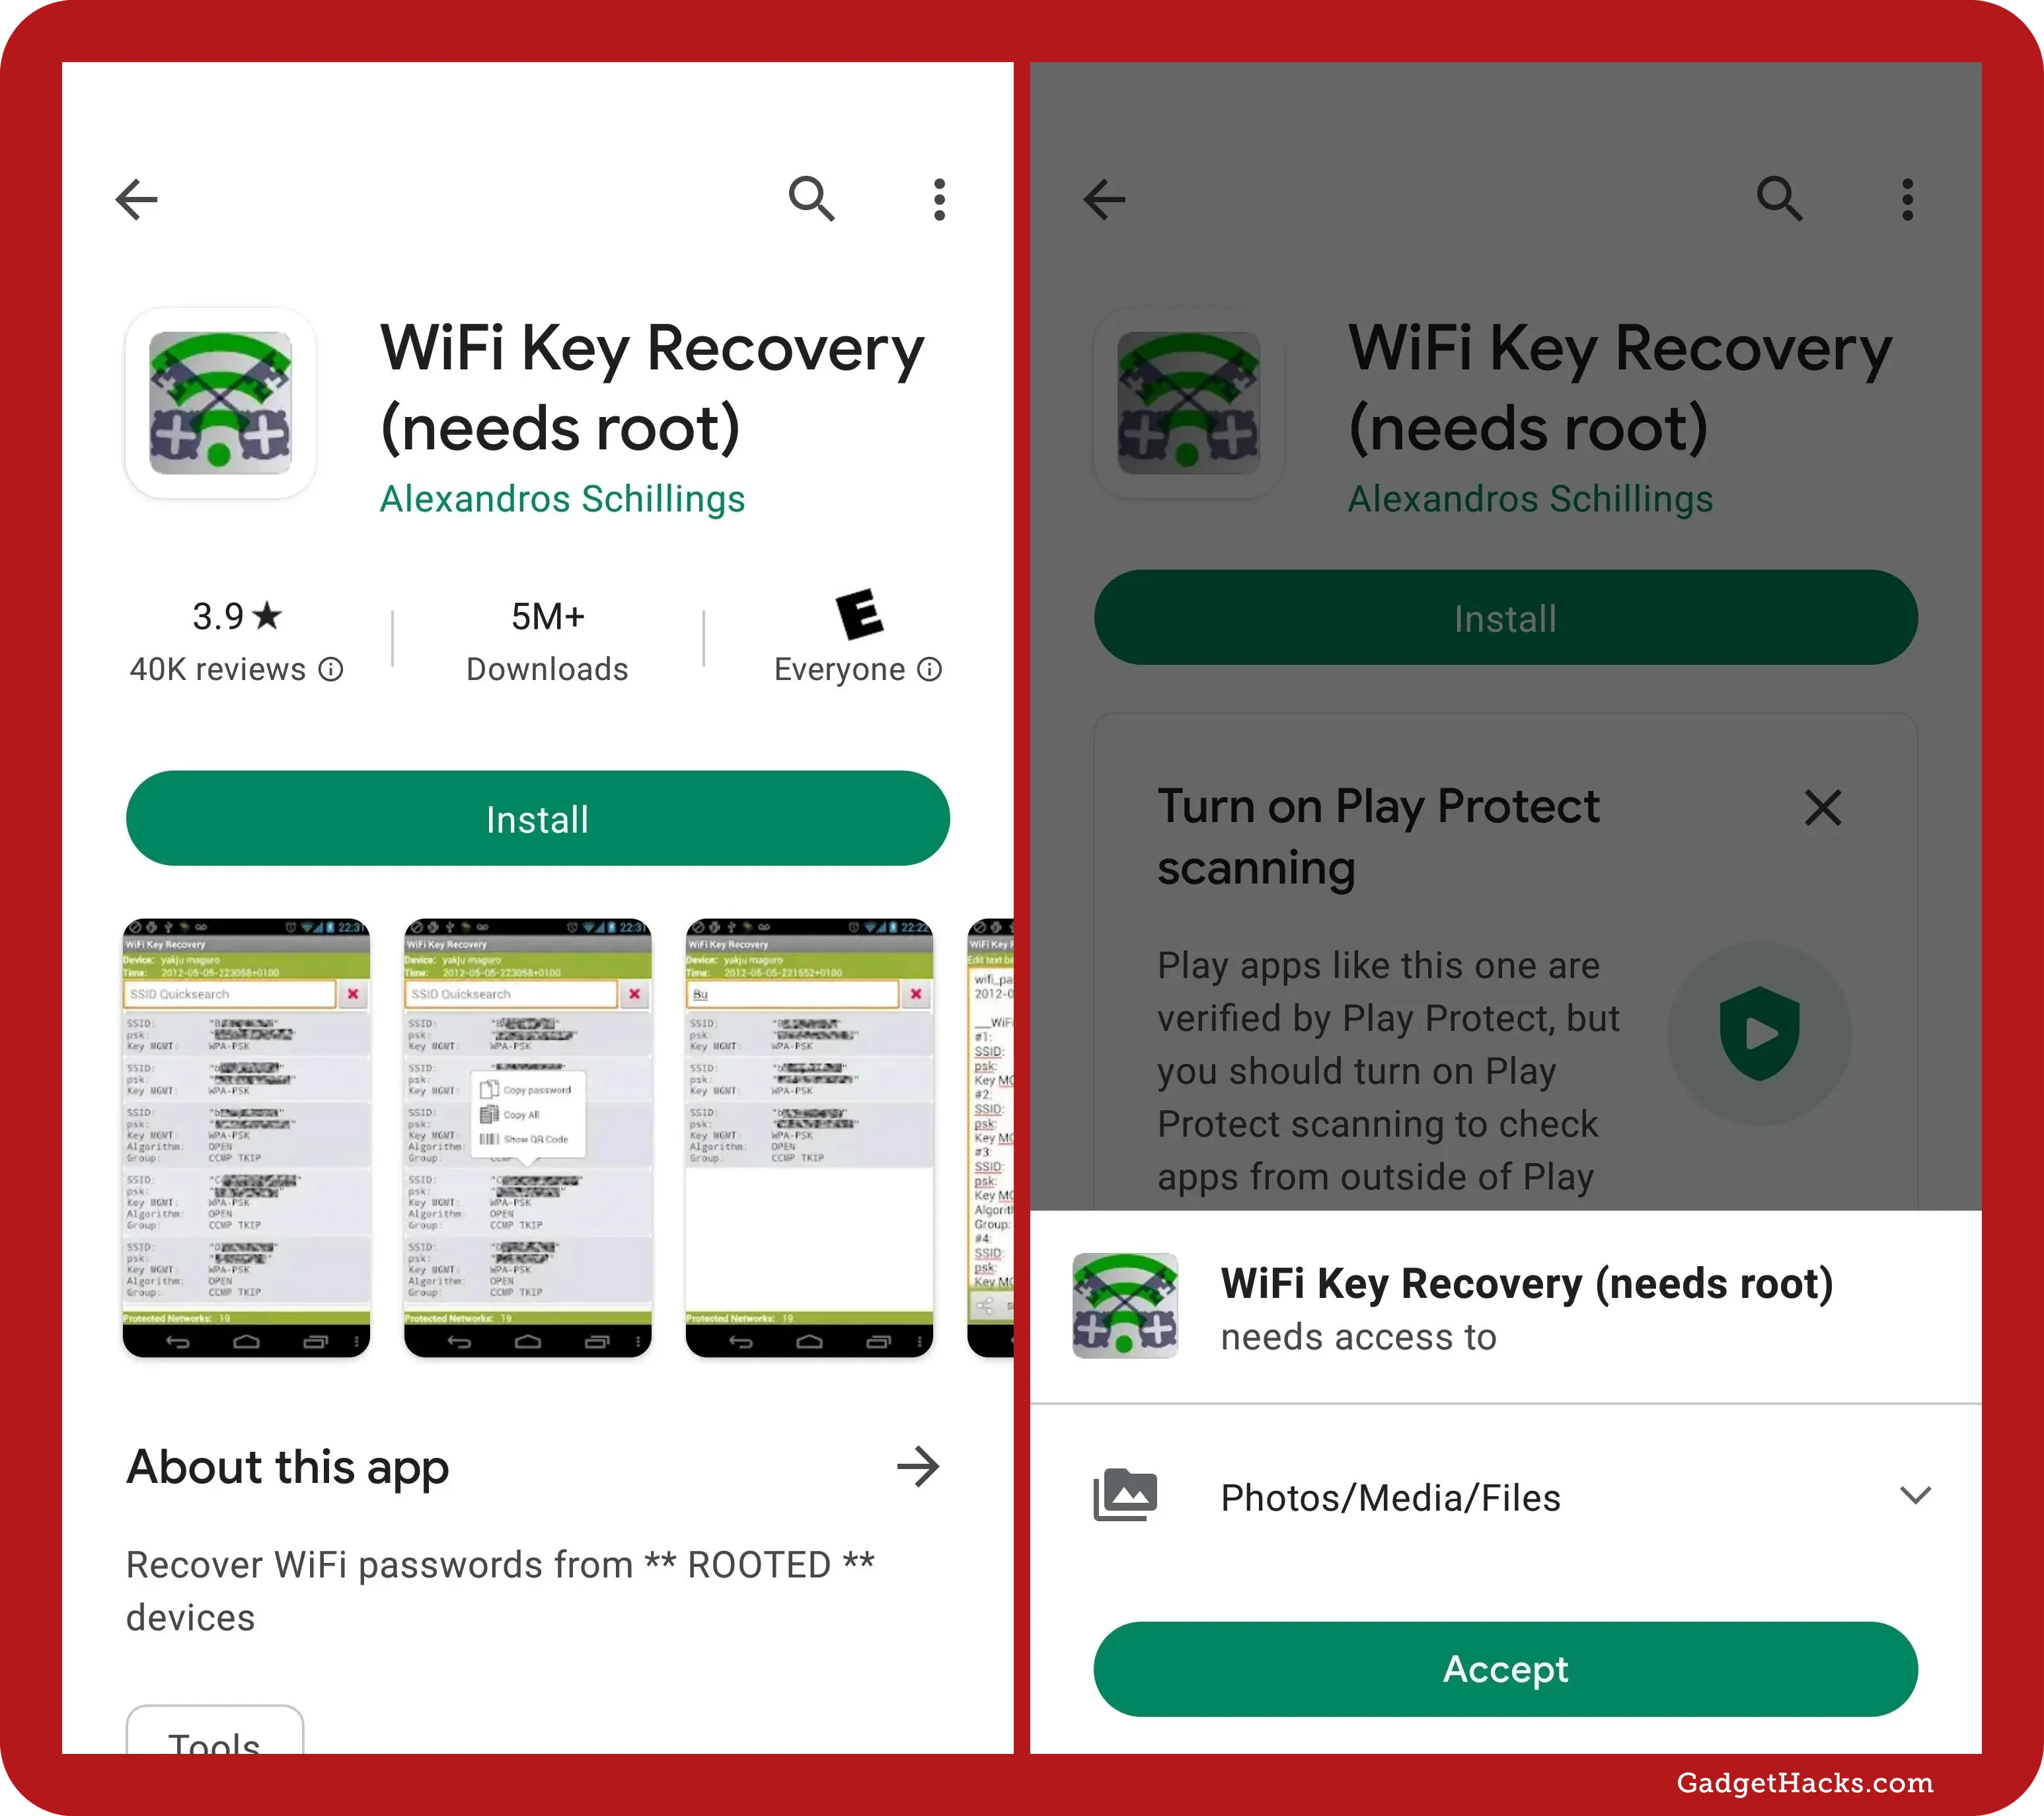
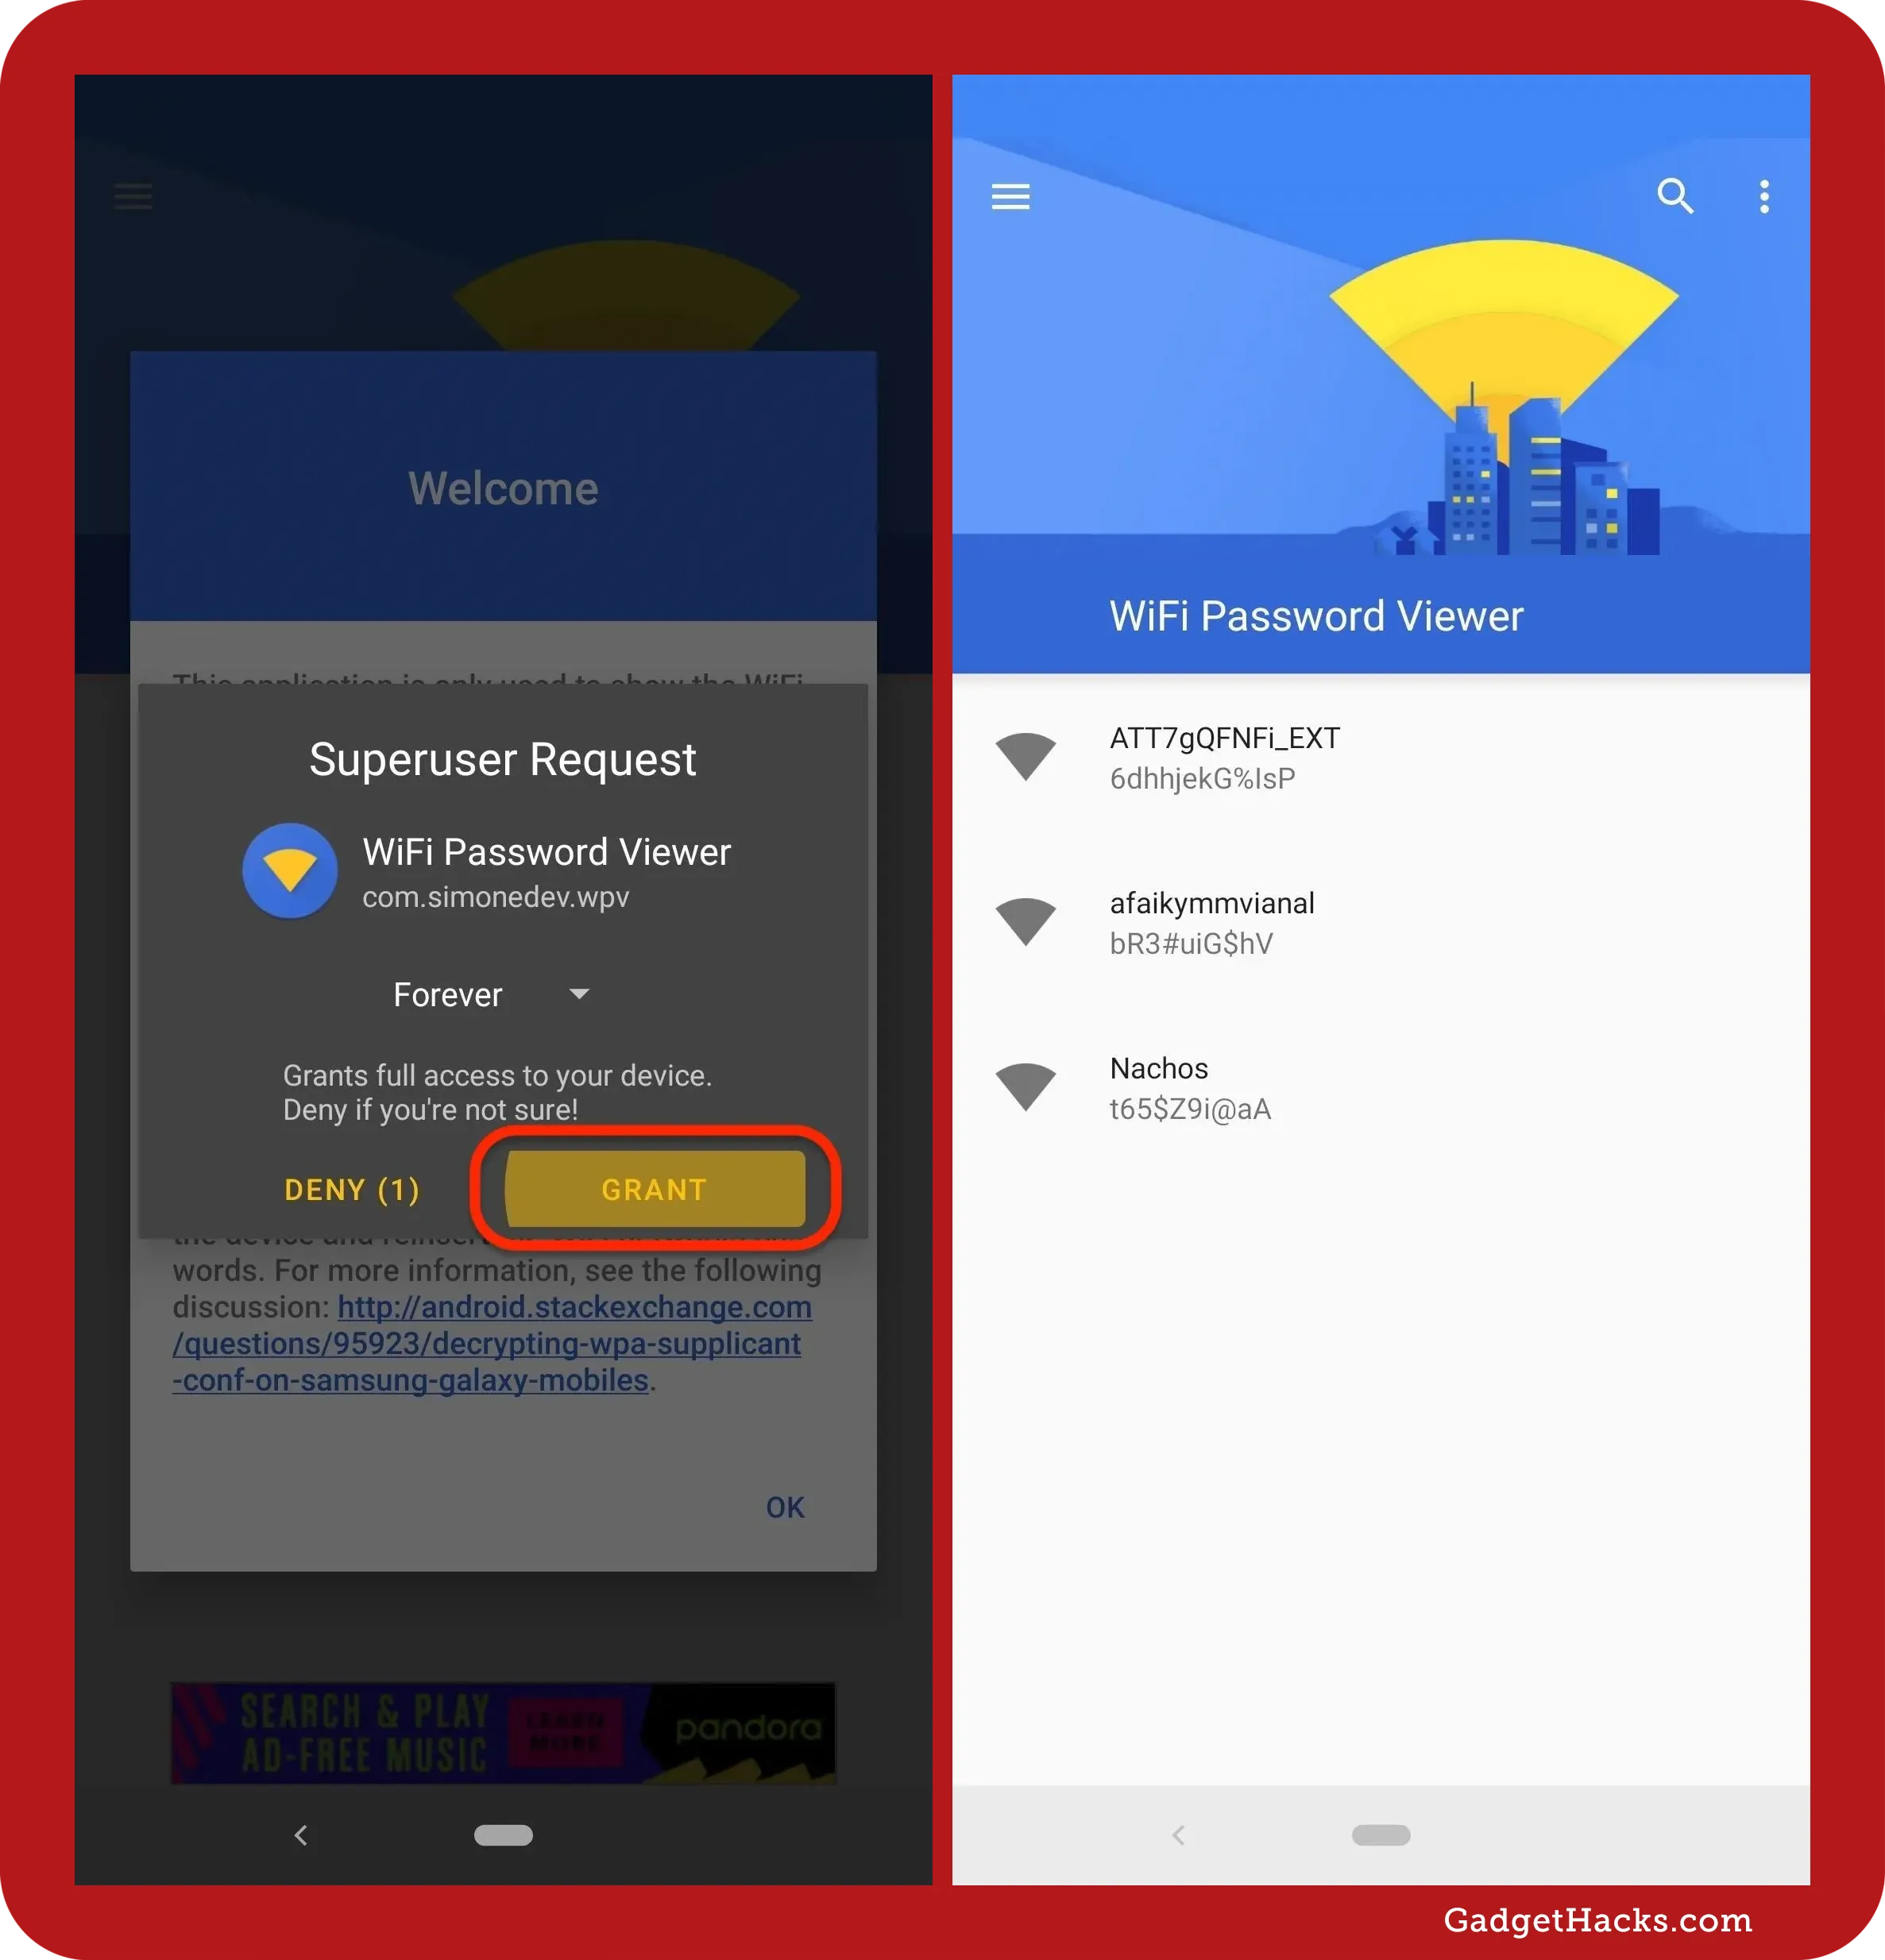
The app will ask for Superuser access when launched since it recovers Wi-Fi passwords directly from system files. Grant it access, and it should take you to a list containing all the Wi-Fi networks remembered on the device. Each entry shows a password beneath it.
If you’ve connected to many different Wi-Fi networks while owning your Android device, your list may be long. If so, you can search for a particular Wi-Fi network using the search button in the top-right corner.
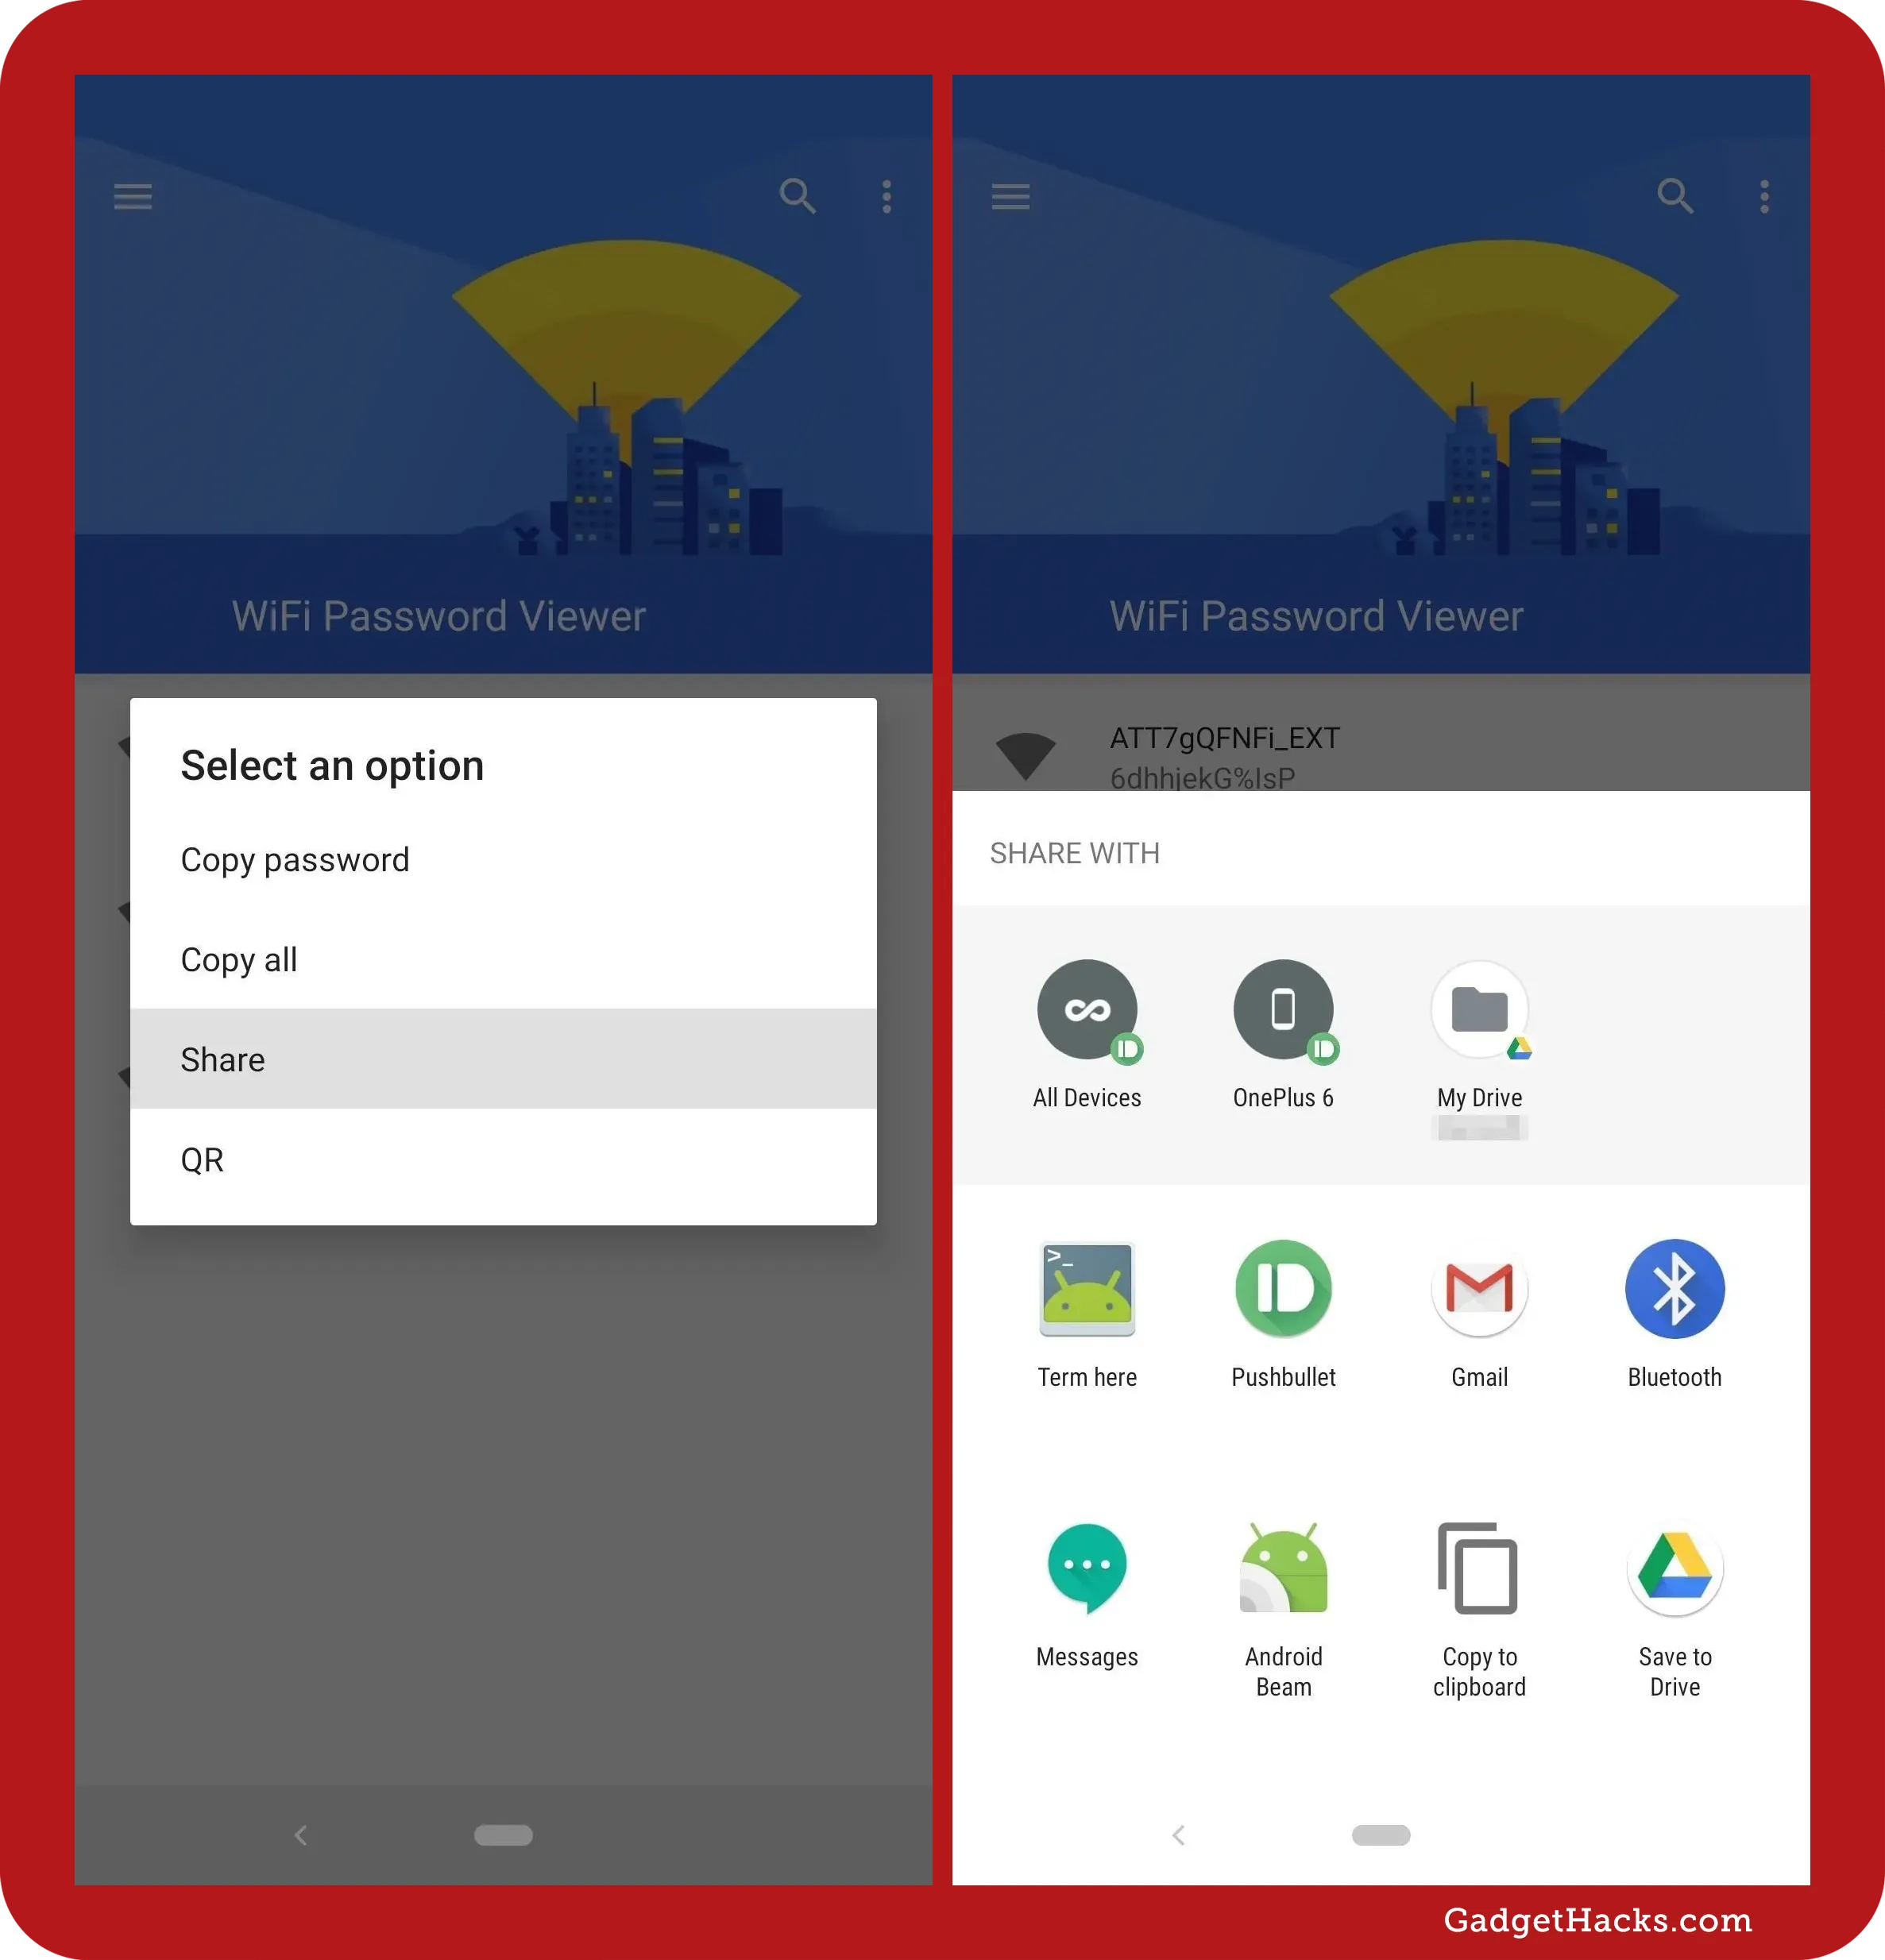
If you need to share one of these passwords with another device, tap an entry, then:
-
Tap Copy Password to copy that network’s password to your clipboard, then paste it into a message for the other device.
-
Tap Share, select a messaging app from the menu, pick a contact, and send it.
-
Tap QR to make the app generate a QR code containing the network info. If the other device has a built-in QR code scanner, open the camera or QR code scanner, point it at the QR code, and tap the pop-up prompt to automatically connect it to the Wi-Fi network.
Don’t Miss: How to See What Traffic Will Be Like at a Specific Time with Google Maps
Cover photo and screenshots by Gadget Hacks.


