I use an Android phone and a MacBook laptop, much to the dismay of my Apple-inclined friends. While the ongoing war between iPhone and Android users continues, I’ve found that this pairing gives me the best of both worlds.
Android’s versatility allows for customization, while my MacBook delivers powerful performance for work. Transferring files between both platforms is where it gets tricky. It isn’t as seamless as it is within the Apple ecosystem.
I could gotten an iPhone (which I did), but my primary phone remains an Android, and I just can’t get used to iOS. Fortunately, moving files isn’t too stressful with the right tools. Here are the most reliable ways to share files between both operating systems.
How to transfer files from Android to MacOS with Bluetooth
Good ol’ Bluetooth remains a top option for file transfer between devices because it’s widely compatible, wireless, and easy to use. Even though it’s slower than some modern methods, nearly every device from an Android phone to a Mac or otherwise has Bluetooth support. That reason alone makes it convenient for cross-platform file sharing. Here’s how to use it:
First, we pair both devices.
1. On your MacBook, click the Apple icon in the top left corner. Then select System Settings.
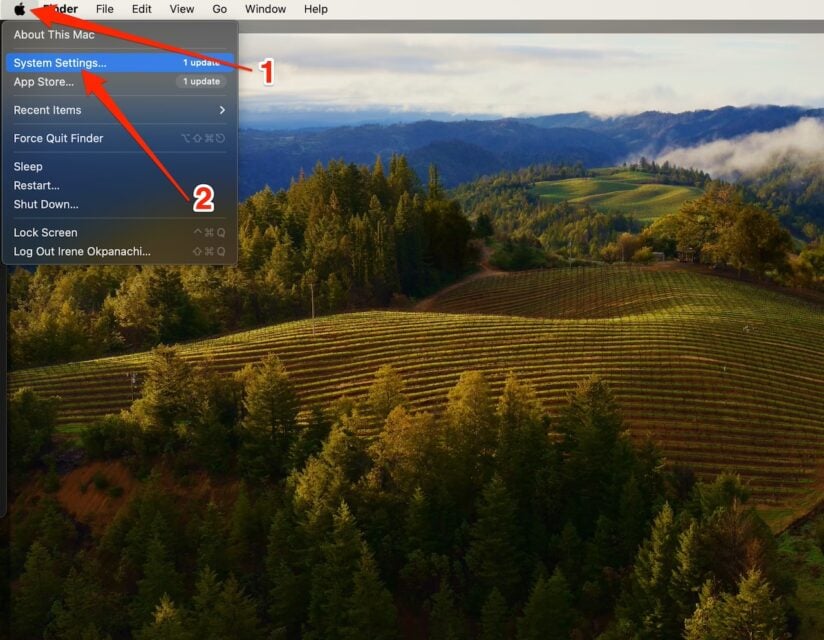
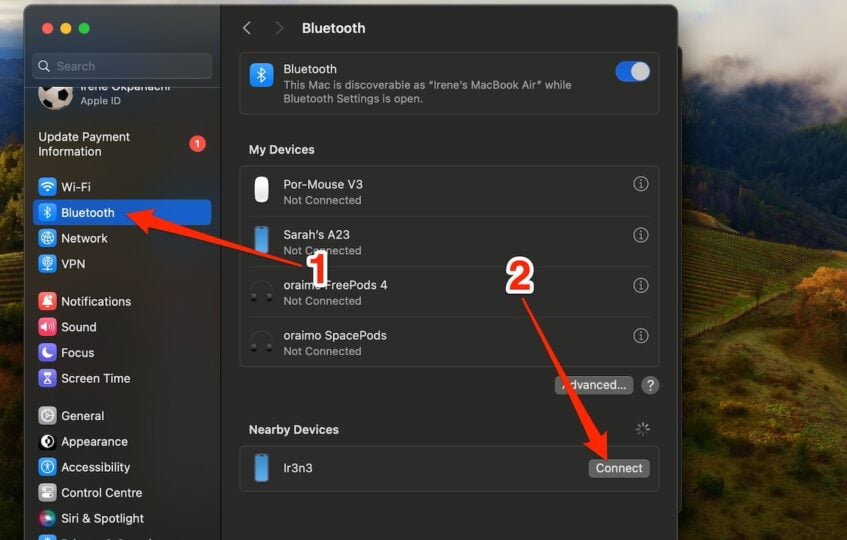
2. Select Bluetooth. Your computer will scan for nearby devices. When it detects your phone, click Connect beside it.
3. You should see a pop-up connection request with a matching code on your phone and the computer. Click Pair on your phone or OK on the computer to successfully connect them.

Now, let’s send files from your Android device.
1. On your Android phone, access the file you want to send. It can be a photo in your gallery app or a document in your file manager app.
2. Long-press the file. Then tap the Share button.
3. Select Bluetooth from the sharing options.


4. Select the MacBook from the list of available devices. Your file should arrive on the MacBook shortly, depending on its size.

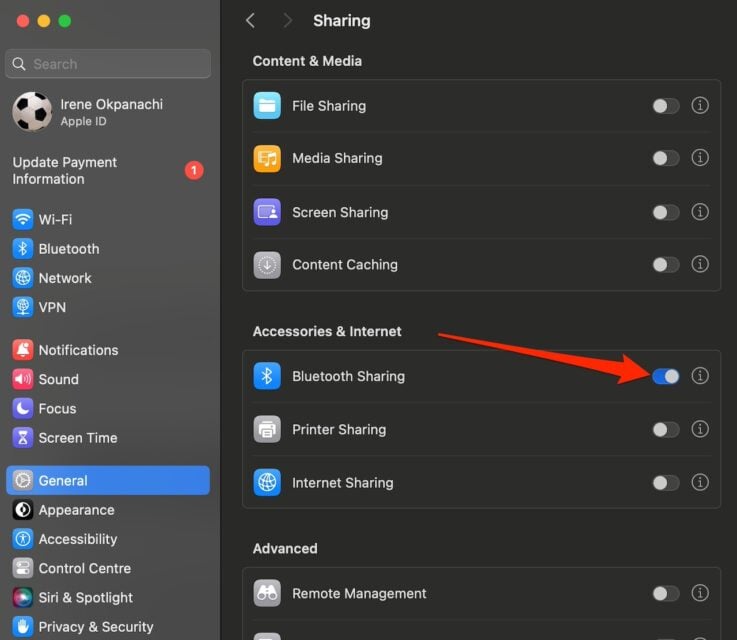
Note: If you’re unable to share Android files to the MacBook, ensure that you’ve turned on Bluetooth sharing on the computer. Go to System Settings > General > Sharing. Then enable Bluetooth sharing.
How to transfer files from Android to MacOS with USB cable
Using a USB cable is another way to transfer files from your Android to a Mac, and it’s pretty straightforward. You’ll just need to connect both devices with a USB cable. If you use an old MacBook Air, new Mac Mini, iMacs, iMac Pro, and the 2013 Mac Pro, you still have the USB-A port on your computer. You can plug in your phone’s charge cable and make the transfer.
If you have a newer MacBook model, you’ll need a USB-C to USB-C cable, depending on your phone’s charging port. You may not have one, but you have a docking station or hub. This device expands the number of available ports on a computer.
Simply connect the hub to your PC’s USB-C port, then connect your cable to the hub and your Android phone. The computer should detect your phone afterward. Follow the steps below to complete the process:
1. You’ll see a system notification when you swipe down from the top of your screen. Tap it and choose the File transfer / Android Auto option. You can now access files and folders on your Android device from the computer.


2. Open the Finder from the bottom left corner of the MacBook’s Dock. You should see your phone appear under the Location sidebar. Click it to view its content.

3. Drag and drop any file to another sidebar on your MacBook. You could also right-click on the file and select the copy option. Then paste the file in your preferred location.
How to transfer Android files to MacOS with Android File Transfer
Android File Transfer is a free and official application developed by Google that allows you to transfer files between a Mac computer and an Android device. You can send photos, music, and documents.
The app requires running macOS 10.7 (Lion) or higher software versions on your computer, and the Android device should support file transfer through USB. Once you meet these requirements, follow the steps below to transfer your Android files:
1. Visit the official Android File Transfer website and install the tool on your MacBook. Then download the app.
2. Once the download is complete, you’ll see a pop-up window prompting you to drag the disk image into the Applications folder. Do it to complete the installation process.

3. Connect your Android phone to the laptop with a USB cable. Then open Android File Transfer from your computer’s Launchpad.

4. In a different window, open Finder and navigate to where you want to save the Android file.
5. Drag the file from Android File Transfer to the location you opened in Finder to copy it there.

Tip: If you want to transfer multiple files from Android File Transfer, hold down Command on your keyboard and click them. Then drag them to your preferred folder in Finder.
How to transfer Android files to MacOS with NearDrop
Nearby Share is Google’s answer to Apple’s AirDrop, allowing you to send files between devices that are close by. It uses Wi-Fi or Bluetooth to make the connection, so you don’t have to worry about cables or complicated setups. Unfortunately, both Nearby Share and AirDrop are restricted to their respective operating systems.
Someone recognized this gap and stepped up to create a solution. NearDrop is that solution, an open-source app designed for macOS. It was reverse-engineered to allow parts of Nearby Share to work on Mac.
The app allows you to receive files on your Mac from your Android, but you can’t send them from the Mac. It shouldn’t be a problem if you mainly need to receive files from your Android phone.
Note: While NearDrop is a reliable option for transferring files from Android to Mac, it’s not the only app available. I’m highlighting it because it’s been tested and trusted. You might find other great apps with a simple Google search. Just be sure to check out real reviews and ratings before you use them.
Here’s how to use NearDrop:
1. Download NearDrop from GitHub and install it. MacBook may stop you from installing the app for security reasons. Go to System Settings > Privacy & Security. Scroll down and tap Open Anyway beside the flagged NearDrop app under the Security section.

- If the installation process is complicated or you run into issues, paste the following command into Terminal (this method is faster). It installs NearDrop on your MacBook using Homebrew without applying extra security checks. You can quickly find the Terminal with a search in Finder:
brew install --no-quarantine grishka/grishka/neardrop

2. After a successful installation, grant notification permissions for NearDrop in the System Settings menu. It will alert you of incoming files and verification codes you don’t want to miss. Go to System Settings > Notifications > NearDrop. Then enable the toggle switch beside Allow Notifications.
3. Open NearDrop from the Launchpad, and the app opens in the menu bar. It’s in the top right corner of your screen. Then connect your phone and the MacBook to the same Wi-Fi network. It helps your phone to detect the computer.

4. On your Android phone, locate the file you want to transfer. Long-press it and tap the Share button.
5. From the Share options, select Quick Share and turn on Bluetooth. Your phone should detect the MacBook nearby. Tap your MacBook’s name when you see it.


6. A notification will appear on your MacBook with a confirmation code. Accept the transfer request. The file should appear on your computer in seconds.

Move any file easily across Android and Apple’s devices
There you have it. Transferring your Android files to MacOS isn’t as hard as expected. Whether you choose Bluetooth for quick sharing, a USB cable for direct transfers, or Android File Transfer for a more secure approach, you now have options to get the job done.
You may also want to move your music playlists from Apple Music to YouTube Music or vice versa. No one would blame you because of rising prices. Even if you’ve spent time creating those special playlists, you can use apps like Soundiiz, FreeYourMusic, and TuneMyMusic, to begin the process. Don’t let the fear of losing your songs stop you.


